Overview Active shipments
- Overview Active shipments
- Where to find
- Extra functionality
- Explanation functionality
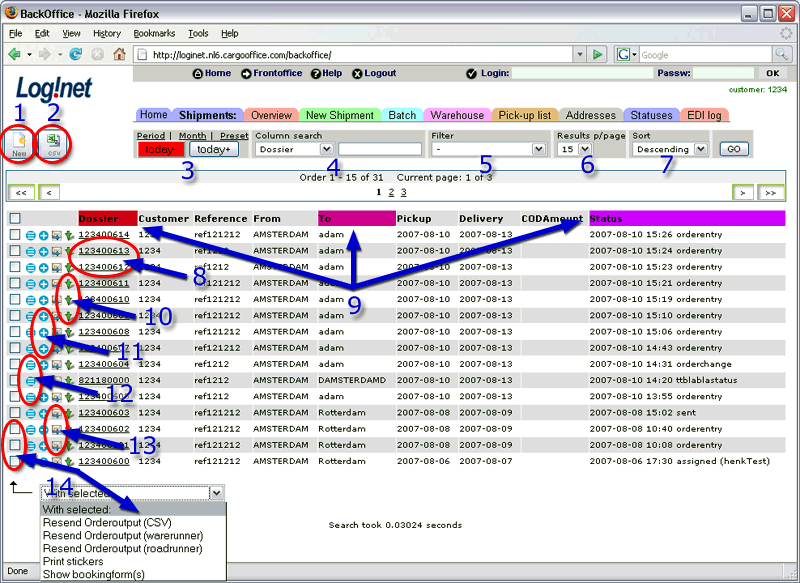
- 1. Add Shipment
- 2. Download CSV
- 3. Date selection
- 4. Search function
- 5. Filters
- 6. Shipments per page
- 7. Ascending/descending
- 8. Show booking details
- 9. Sorting
- 10. Map system
- 11. Edit shipment status
- 12. Edit/Modify shipment
- 13. Resend order
- 14. Options for multiple selected shipments
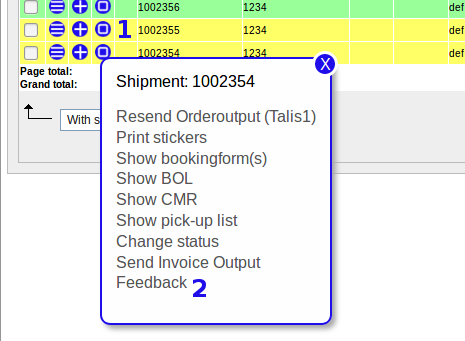
- 15. Feedback option for users per shipment
Where to find
- for company staff:
- Backoffice -> Shipments -> Active Shipments
- Backoffice -> Dispatch -> Shipments
- Backoffice -> Track & Trace system -> Active shipments of all customers.
- for customers: level 10-users are only able to see their own (customerID) shipments.
- Frontoffice -> Orderentry -> Active shipments
- Frontoffice -> Track & Trace -> Overview of active orders
Extra functionality
- By default shipments are deleted after six weeks.
By request it is possible to implement the history system, then shipments are available for at least 1 year. - Display of multiple goodlines inside shipment overview.
Explanation functionality

1. Add Shipment
Adding a new shipment, by using orderentry: see How to enter an order.2. Download CSV
Download all selected orders as a CSV-file on a local computer or network.CSV-files are easily imported into openOffice or into Microsoft excel software.
3. Date selection
- Today- shows all shipments of delivery dates from the past.
- Today+ shows all shipments of future delivery dates.
- When using Period a selection of shipments can be made between two delivery dates.
- Month shows all shipments from the selected month.
4. Search function
- allows you to search a column for a specific value (don't forget to press "go").
- Multiple columns can be searched by adding an ampersant (&) and an extra column, for example: From=Amsterdam&To=Paris&Customer=12345
- Advanced users may use regular expressions
 , for example: Postcode=/^[3-5].*/
- New columns can be added to this list of active shipments via parameter ttinfolistcolumns.
- Create 'filters' for commonly used searches, see the next item.
5. Filters
- Specific filters can be created. When using this option do not forget to checkmark it and press "go".
- For more documentation, see: How to use filters.
6. Shipments per page
- Select the amout of shipments you like to have displayed per page.
- Also see parameter: ttinfolistNumResults.
7. Ascending/descending
- Decide if you want your results to be shown ascending or descending.
- The way results are sorted could also depend the way you have selected your column headers (see 9).
8. Show booking details
- Clicking the link of a particulair order (dossier or shipmentID) will show all booking details including all statusses of this particulair shipment.
- The display of booking details is template based, read more in Booking templates
9. Sorting
Three different sortings can be made.- The darkest colour is the first sorting, the lightest colour is the last sorting.
- After a first sorting is made, results can be the same. When results are the same then a second (and third) sorting can be made, so a more refined list of results can be presented.
- Note: A coloured head will disappear when clicking on it. A colour head will appear when clicking on a non-coloured head.
- Note: Status field is mandatory inside the column display.
10. Map system
Clicking the green arrow displays a map.- Depending of your setting of your parameter mapsystem you are linked to a mapsystem.
- When pickup addresses and delivery addresses are correctly filled in, google maps serves you an option to calculate distances, see: Calculate Route.
- In another grid-version, there is an option to group buttons like these. Wether to install this option or not, use parameter ttinfoGroupButtons
11. Edit shipment status
- For every selected shipment, new statussus can be given in. Read more in: Shipment status.
12. Edit/Modify shipment
- Edit this particulair shipment.
13. Resend order
- Resend this particulair shipment, see: How to resend orders.
- This can also be done by 14).
- In another grid-version, there is an option to group buttons like these. Wether to install this option or not, use parameter ttinfoGroupButtons.
14. Options for multiple selected shipments
- All shipments can be selected.
- Selecting all shipments or deselecting all shipments can be done by clicking the selection box located on top of all selection boxes.
- For one or more selected shipments simultaneous actions can be performed, like resending orderoutput, printing stickers or showing bookingforms.
- For more information about "Print stickers", see: Print stickers.
- For more information about "Show bookingform(s)", see: Booking details.
- For more information about "Show BOL", see: BOL templates.
- For more information about "Show CMR", see: CMR templates.
- For more information about "Show pick-up list", see: Drivers Pickup List.
- For more information about "Change status", see: Modifying shipment status.
- For more information about "Transport Guide", see: Start up Guide
- For more information about "Send invoiceOutput", see #1.: To be invoiced.
- With the selection "Freight Exchange: Create offer / Remove offer", this order is created/removed in your Freight Exchange, see: Freecargo Quick Start.
15. Feedback option for users per shipment
It is optional to have a feedback form installed.Customers are then able to leave comments about their shipments, report manco's, sent compliments, etc.

- 1. Click the action button of the shipment
- 2. select the Feedback option.
- 3. See the description of the default feedback application.
- Per carrier different forms can be created.
- If interested in this option, sent Cargo Office Programmers a request.
| I | Attachment | History | Action | Size | Date | Who | Comment |
|---|---|---|---|---|---|---|---|
| |
tracktrace4.gif | r2 r1 | manage | 103.4 K | 2007-08-14 - 11:19 | RutgerRutgers | Overview active shipments |
Topic revision: r17 - 2021-03-02 - RutgerRutgers
Ideas, requests, problems regarding TWiki? Send feedback


