Freight Exchange Quick Start
Find Freight or Equipment offers
Where to find
- Freecargo.com -> Login -> Offers -> Freight Exchange menu (on the left side)
- Back Office -> Community Tools -> Freight Exchange -> Freight Exchange menu (on the left side): Post freight
- Back Office -> Community Tools -> Freight Exchange -> Freight Exchange menu (on the left side): Post equipmen
Offers overview

- If you do not see anything, click button Clear to clear your former searches.
- Or become part of a closed user group or start your own closed user group.
- More about Groups and Contacts
- Make a choice between freight or equipment offers.
- Clicking on the info button on the left side opens a pop-up with the details of the offer.
- Clicking on the info button on the right side opens a pop-up with details of the owner of the offer.
- By clicking on the edit button you can edit your offer.
- Note: This button is only available if you represent the owner of the offer.
- By clicking on the delete button you can delete your offer.
- To avoid multiple messages, delete the offer asap if it's not available anymore.
- Note: This button is only available if you represent the owner of the offer.
- By clicking on the map button you can see the location of the offer.
- The status column tells you if the offer is free (from the public exchange) or from a partner (closed user exchange).
- By clicking the refresh button, all offers are refreshed.
- Some offers may have disappeared or modified in the meantime.
- Recently added offers are displayed in red font.
Detailed Search

- By using the list box image behind the from and to field a pop-up displayed with maps of all countries of the world to specify your search.
- You can also start typing the country or location you are looking for, a drop-down of names or the pop-up with countries will appear.
- A radius in kilometers to display offers around the selected location (from #3).
- Don't forget to hit the search button when you are looking for the result.
- And if you want to clear your former searches, click the Clear button.
- If you want to check if you missed something in the meantime, click the Refresh button.
Zoom in, zoom out

- Use the Map on the left side of your screen to zoom in on certain area's.
- Click an area on the map to zoom in
- The system will automatically search for offers in that particular area
Post Freight or Equipment offers
Post Freight or send a Request For Quotation
Where to find
- Freecargo.com -> Post Freight
- Back Office -> Community Tools -> Freight Exchange -> Search menu: Post Freight
- Back Office -> Community Tools -> Freight Exchange -> Search menu: Post Equipment
How to start

- 1. Choose 'Post Freight' from the main search menu.
- 2. Choose 'Post Equipment' from the main search menu.
The Post Freight Form

- Use the [Tab] key to jump from one item to the next.
- 1. By using the list box image behind the from and to field a pop-up displayed with maps of all countries of the world to specify your search.
- Place of departure (FROM) and destination (TO) are mandatory.
If the automatic address tool gives you multiple options, add the ISO-code of the desired country (AU for Australia, AT for Austria, etc)
- Place of departure (FROM) and destination (TO) are mandatory.
- 2. By clicking the map button you can check the inserted location of your offer.
- 3. Use the calendar button to select a date or use the arrow button to select either daily, weekly or monthly.
- If the offer is available for several days then select a date and enter the number of days in Available for.
- Use correct data, that means better matching and a greater chance that someone will be notified about your offer.
- 4. Goods: enter a brief description of the goods or use the arrow button to select a standard description.
- A standard description is recommended for automatic matching.
- The drop down of values can be made adjustable by parameter.
- 5. Modality: enter at least one modality and one type.
- You can add more options.
- The more options you add, teh bettter your response will be.
- 6. Contact:verify your contact details.
- This makes it easier for business partners to contact you.
- You can change your contact details in: BackOffice -> Settings and Management -> Users
(you have to log out and log in before noticing any result)
- 7. Send to a Group: send your offer to a specific group or to all groups.
- For groups: You are able to create your own group of users to do business with.
- Read our short explanation about groups and contacts.
- Note: From contacts you can send a RFQ to a specific user.
- 8. Send to Others after x minutes.
- Transport companies have the ability to sent their offer to the Open Exchange (FreeCargo)
 after a certain amount of minutes.
- Transport companies have the ability to sent their offer to the Open Exchange (FreeCargo)
- 9 Submit: send your offer to your preferred partners or all users.
- 10. Save as default: save the values you filled in the form as default, so you can use them next time again.
- 11. Clear all values from this form (and start again).
- 12. Show recipients: displays all recipients you've selected (see 7.) neatly below the form, so you can check/adjust them.
- Note: this is only visible after you have filled in form details.
- 13. Back: Go back to where you came from.
- Note: This form is template based, we can create a different template according your wishes.
Post Equipment
The entry form for equipment offers (trucks, vans, trailers etc) is largly the same as the entry form for freight offers.Also the usage of the form is largely the same.
This is an example:

About users
Where to find
- Cargo Office -> Back Office -> Settings and Management -> Users
- Cargo Start -> Menu -> Settings -> User details
- Transport Guide Info -> Menu -> Settings -> User details
- Transport Commander -> Menu -> Settings -> User details
About
- Per user access restrictions can be set according to their level and the systems (modules) they use.
- There is at least one administrator / admin user (userlevel 70) who is able to add new users.
The user list
- The image below shows an example user list, a description follows
 Description:
 - Button to show administrators (userlevel 70 users).
- Button to show all users (the default).
- Email messenger, tool to communicate fast and directly with (part of) your users.
- Button to add a new user.
- Tool to upload multiple users per CSV-file.
- Search inside your users.
- Travel through your users.
- Per page there are 50 users displayed.
- The > button brings you one page up or down.
The >> button brings you to the first or last page.
-
 Edit user details
-
 Delete user
- Columns of user details.
- Display of user access per system
- Note: when you modify access privelages, do not forget to click "Submit" on the bottom of the page.
- By default, every new user is given access to system orderentry.
- Note: in Cargo Office access can also be set through definitions inside your menu settings, read Add or modify a menu item #11.
- Note: admin users have access to all systems, therefore there are no options available to give access per system.
Add a new user
- Click Add user link (button (4) in the example above)
- The following form appears (example):
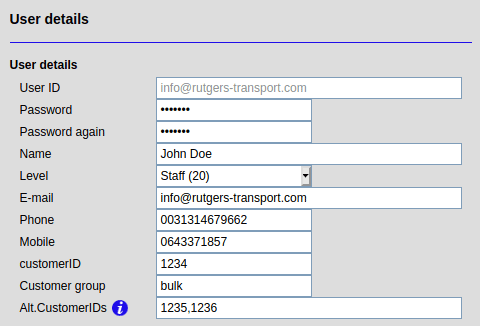 |
- User ID: The user must be an email address (has to contain a "@")
 It is possible to use a fake email address and enter the users real email address in item Email.
- Customer ID: Shipments entered by this user are booked under this customer number or customer ID.
max 13 characters. - Customer group: Enter a group name that classifies the customer. Parameters can be entered for groups of customers (see: parameters).
- Alt.CustomerIDs: external users also get to see shipments for these customers
separate customerIDs with a comma, DO NOT use blank space. - Level is the user level:
- 10 = Customer: e.g. customers using order entry and track & trace
- 11 = Customer + update: customers allowed to update already booked shipments
- 15 = Subcontractor: subcontractors are allowed to change statuses of assigned jobs
- 16 = Subcontractor + update: subcontractors allowed to update warehouse orders
- 20 = Staff: staff members are allowed to access the backoffice
- 30 = Finance: financial staff can be given access to Billing and invoicing system
- 70 = Admin users admin users are allowed to add new users and do other things, see: AdminFunctions
Admin users are very powerfull in Cargo Office, be sure to use a unique password that is difficult to guess by another user of your Cargo Office.
- More info read User details modification.
Import users
- It is possible to import users by sending an XML file through mail or FTP.
- This has to be separately implemented, send us a request by using your bug tracking system.
- New users can be inserted or updated, automatic removal is not possible (for removal see The user list above)
- Below an example of the XML file (the user tag can be repeated for multiple users)
  <?xml version="1.0" ?>
  <users>
    <user>
      <userID>JohnDoe@mydomain.com</userID>
      <passwd>mypassword</passwd>
      <name>Doe</name>
      <firstName>John</firstName>
      <middleInitials></middleInitials>
      <companyName>Johns Private Company</companyName>
      <function>CEO</function>
      <chamberCommerce>UK12345678</chamberCommerce>
      <department>Central Office</department>
      <address>Mainstreet 578</address>
      <address2></address2>
      <city>Los Angeles</city>
      <state>CA</state>
      <country>USA</country>
      <countryCode>US</countryCode>
      <postcode>99950</postcode>
      <tel></tel>
      <fax></fax>
      <mobile></mobile>
      <email>JohnDoe@mydomain.com</email>
      <lang>EN</lang>
      <userLevel>10</userLevel>
      <custID>14252</custID>
      <altCustIDs></altCustIDs>
      <VAT></VAT>
    </user>
  </users>


| I | Attachment | History | Action | Size | Date | Who | Comment |
|---|---|---|---|---|---|---|---|
| |
freecargo09.gif | r4 r3 r2 r1 | manage | 22.4 K | 2007-11-29 - 10:39 | HenkRoelofs | |
| |
freecargo10.gif | r3 r2 r1 | manage | 22.0 K | 2007-11-29 - 11:00 | HenkRoelofs |
Topic revision: r20 - 2019-10-22 - RutgerRutgers

Ideas, requests, problems regarding TWiki? Send feedback