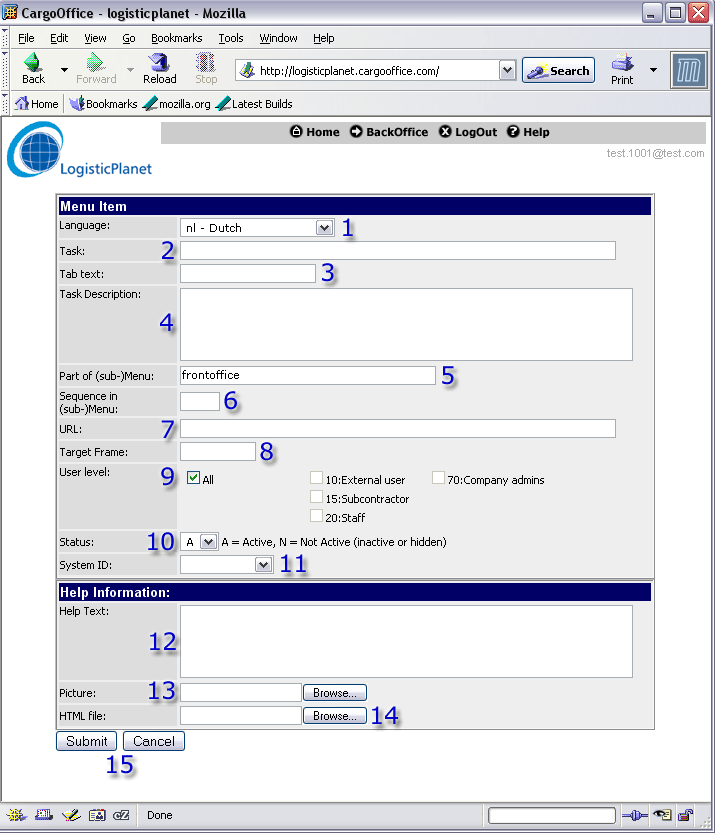
Add or modify a menu item
Where to find
- Click the edit button on any menu-item in Cargo Office.
- Only administrators are able to edit a menu item.
- Click the header of a menu block to get in the sub level of menu -items.
How to create or modify a menu-item in your cargoOffice.

- 1. Language.
Decide in which language you want to show your menu-item (en=english, fr=french, nl=dutch, etc). If the installed language of your browser is the same as in this menu-item, the browser will read this installed language.
The amount of languages you want to install per menu-item is allmost endless. - 2. Task (or Title).
Name this menu-item (if your feeling insure, check with an allready installed menu-item). - 3. Tab Text.
If your Cargo Office owns a coloured button menu in the topframe, a coloured tabbutton is made when inserting a text here. It's better to keep the text short then. - 4. Task Description.
Add a description about this menu-item. What it is about, etc. - 5. Part of (sub-)Menu.
Insert the (sub-menu) location, the place where you want to show this menu-item.
The menu-system consists of different levels. The highest level is "frontoffice" (or backoffice if you want to place a particulair menu-item inside your backoffice.) For every sublevel you have to use the following element "->".
For instance, a second level could be adressed like this: "frontoffice->orderentry". If a menu-item is placed under this second level "orderentry", this second level should exist. This can be arranged in (7).
If you add the menu-item (by using "Add new menu item") and you are already at the level you want to have it inserted, the correct submenu will allready be filled.
(if you're feeling insure, check with an already installed menu-item).
Note. The new menu-functions recognized by the colored buttons on top are named frontoffice3" and "backoffice3". - 6. Sequence in (sub-)Menu.
If there are more menu's under the same menu-header, you can add a sequence number. The lowest number is showed on top of that particulair menu-block. - 7. URL.
The actual URL of the menu-item you want to show.
In general you've got two possibilities:- A. The URL can refer to a menu-block header (the darker grey).
Therefor you have to start with: "showMenux.php?menu=" adding the particulair block you want, ie: "frontoffice->newblock".
All together you end with something like this: "showMenux.php?menu=frontoffice->newblock".
(if you're feeling insure, check with an allready installed menu-item) - B. The URL can refer to a menu-item. This can be the extra webpage you've created before or a webpage somewhere else on the internet.
- 1.
An extra weppage you've created before by User Definable Pages.
You have to start with this part: "/frontoffice/userpages/display.php?page="
Then you have to add the name of the page you've created, e.g.: "page1NL".
Note: the name you add has to be exactly the same as the name you've created with your extra webpage function.
All together you end with something like this: "/frontoffice/userpages/display.php?page=page1NL". - 2.
Some weppage from the internet.
Fill in the correct URL of the webpage you want to add, e.g.: "http://www.bbc.co.uk/"
- 1.
- A. The URL can refer to a menu-block header (the darker grey).
- 8. Target Frame.
The cargoOffice consists out of different frames. Depending on the frame target you insert, your menu-item is shown.
Check with allready installed menu-items for available options. - 9. User level.
If you forgot to whom you wanted to show this menu-item, read Explaining user levels. - 10. Status.
Keep active or show inactive if you want to hide this menu-item.
Inactive menu-items are not visible for users lower than level 70. - 11. System ID.
You can use this tool to regulate access to this menu-item.
Choose the system that correspondents with the users you want to give/restrict access..
If you're importing a self created webpage or a webpage from the internet add: "backoffice". - 12. Help Text.
The added text is shown in the question mark sign of this particulair menu-item. - 13. Picture.
The added picture is shown in the question mark sign of this particulair menu-item. - 14. HTML file.
The added HTML file is shown in the question mark sign of this particulair menu-item. - 15. Buttons.
Click "Submit" when adding this menu-item or click "Cancel" if you want to cancel your action.
-- RutgerRutgers - 01 Sep 2006
| I | Attachment | History | Action | Size | Date | Who | Comment |
|---|---|---|---|---|---|---|---|
| |
extrawebpages4.gif | r1 | manage | 50.9 K | 2005-12-09 - 14:43 | RutgerRutgers | Create new menu-item |
Topic revision: r3 - 2017-08-21 - RutgerRutgers
Ideas, requests, problems regarding TWiki? Send feedback


