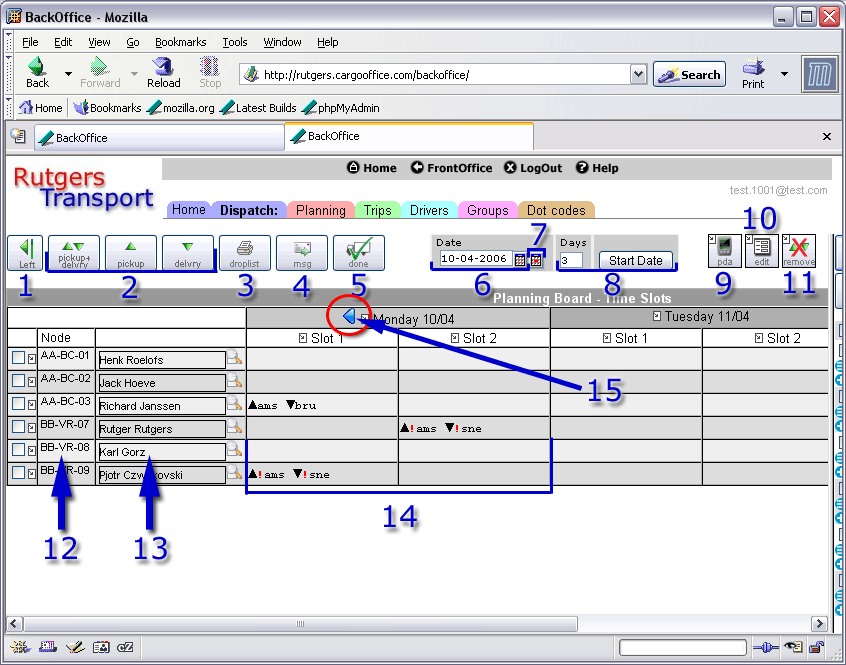
Description of the planning board
- The planning board can be found at Backoffice -> Dispatch: left frame.
- In the screen below most functionality about the planning board is described. Other functionality you can find here.

(click to enlarge)
- On the top of the planning board is the following message displayed: Full reload in "x" minutes.
- This reload only occurs for the planning board (the left side of dispatch), the right side (with active shipments) is not effected. A refresh for the right side can be set by using parameter ttinfoRefresh.
- By default the full reload starts at 5 minutes.
- 1. Takes you to the right (jobs) screen.
- 2. Dispatch buttons
- 3. This button shows the joblist for a particulair node. First you have to select a node before the joblist is shown. See: Print job list.
- 4. By using the message-button you can sent a message to a selected node. See: Send message to node.
- 5. When using this button all jobs of selected nodes will be marked completed.
Jobs which are marked "completed" or "done" will no longer been shown inside your planning board. See: Remove jobs from planning board. - 6. By clicking the calander you can display any date you like.
- 7. This brings you back to planning board of today.
- 8. Select the amount of days you want to display on your planning board. Dispatch is standard configured at 3 days, you can change this inside your dispatch settings.
- 9. When dragging your job to this pda-symbol, your transport order is added to the pda-screen, see: How to change the shipment status with help of the PDA-screen.
- 10. When dragging your job to this edit-symbol, you are able to edit this particuliar transport order. See: Update job.
- 11. When dragging your job to this symbol, you can remove the job from the planning board. This transportorder will pop up again at the right screen and is ready to be dispatched again, see: Un-assign jobs.
- 12. In this column all nodes are displayed which have been created inside the drivers screen and are marked as dispatch node.
Please note that different types of nodes can be selected. A node can be a driver, a vehicle, a machine or an equipment part. In this example we have chosen to displaye vehicles. - 13. When pressing the looking glass it is possible to add drivers, machines, parts, etc, to a particulair dispatch node. These additions are also nodes, but are not marked as dispatch node, also see: DispatchNodes.
- 14. Days can be devided into a number of slots. Number of slots can be defined inside dispatch settings.
- 15. Browse backwards through the planning board, or forwards when using the blue arrow on the other side of this screen.
-- RutgerRutgers - 27 Sep 2006
| I | Attachment | History | Action | Size | Date | Who | Comment |
|---|---|---|---|---|---|---|---|
| |
dispatch04.gif | r1 | manage | 61.6 K | 2006-04-10 - 10:42 | RutgerRutgers | left screen description |
Topic revision: r4 - 2017-06-29 - RutgerRutgers
Ideas, requests, problems regarding TWiki? Send feedback


