TrackTrace.Info : How to add a shipment (Long version)
How to enter a shipment
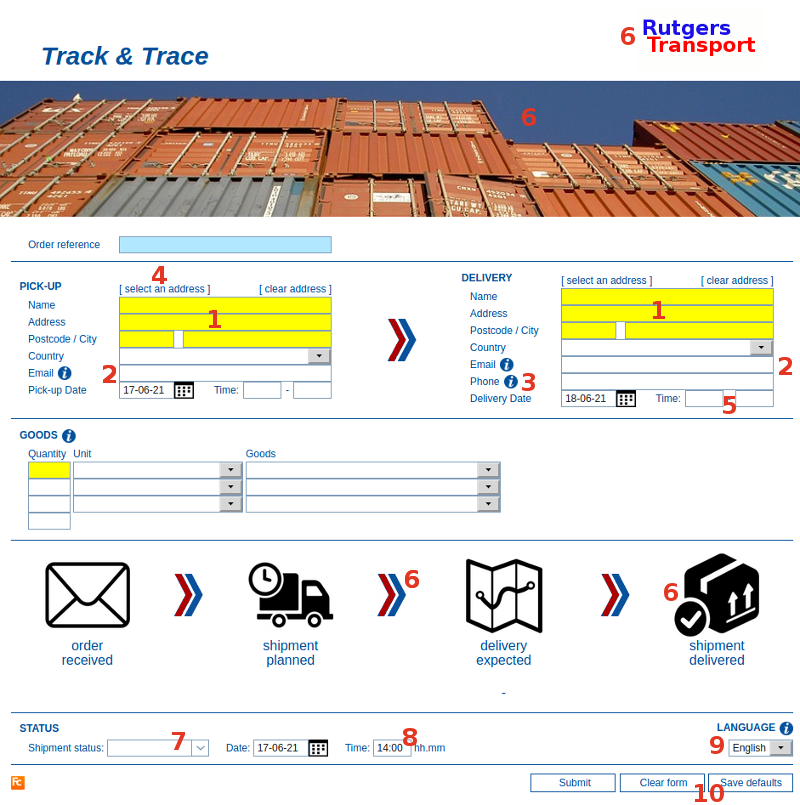
We can add/delete/modify all fields in this form (pickup, delivery, goods, status and other fields).- Instead of select or drop-down values, we can modify them to open text fields.
- The values of the select boxes you can alter by clicking Menu on the top right of your screen and choose: Settings.
- Note: we have options to import or export your shipments by EDI (Excel files, XML files, files from other software suppliers). Just ask us.

- The yellow fields are requested to be filled otherwise the form can not be submitted.
- If you want to have this modified, ask us.
- The email addresses for pick-up and delivery will automatically receive messages .
- The type of message varies depending on the status you set on the bottom of the page (and wether it is a pickup or delivery address).
- Tip: when you enter your first shipment put your own email address here, so you can check what kind of message you are sending.
- In the message you are sending there is a link which opens a screen that shows the exact status of your shipment.
- See the description of the default Track and Trace screen.
- Note: there is no guarantee that an email is well received by the person you are sending it.
- We can guarantee that our service will work fine, but we can not control spam boxes or mail servers settings of the recipient.
- Therefor many companies still use text messages for more critical shipments.
- Note: By default messages are sent from domain CargoOffice.com
- That's the main reason why there is a disclaimer text in the messages you are sending:
Do not reply to this email directly. Your message will not arrive. Please contact your carrier in another way. - This can be altered if we sent messages from your domain. If this is requested, simply ask us.
- That's the main reason why there is a disclaimer text in the messages you are sending:
- The type of message varies depending on the status you set on the bottom of the page (and wether it is a pickup or delivery address).
- As extra security you can also sent text messages.
- You can not always be sure wether your email has arrived (due to spam boxes of the recipient or mail servers settings of the recipient.
- For sending text messages an extra fee is asked for. If interested, just ask us.
- All addresses you enter will be saved automatically, so you can re-use them again by [select an address] or typing the first characters in the Name field.
- Delivery date and times are filled by default in the expected day and time window.
- Of course this can be altered.
- The logo (top right), is the default Tracktrace.Info logo.
- If we can find your logo, we can put it here.
- We can add or change any picture in this form (to resemble your company style).
- Every time you submit a form a specific status is set.
- The last status that is set, you can see in the shipments overview, in the column: Status
- An overview of all statusses you can see when you open the Booking Details (click the link of the shipment number in the column: shipment).
- By default there are 4 statusses available corresponding with the symbols: order received, shipment planned, delivery expected and shipment delivered.
- More information about statusses.
- If requested we can add any status you prefer and add any action you prefer (including sending documents).
- The last status that is set, you can see in the shipments overview, in the column: Status
- Every status that is set when the form is submitted, can trigger messages.
- You can set different dates and times per status.
- These dates and times will automatically appear on the screen that is sent by your email messages.
- More information about messages.
- You can set different dates and times per status.
- In which language your message is sent can be controlled by the language you set in the top bottom part of your form.
- In case you have clients in other regions you can inform them in their own language.
- Note: the track and trace screen that is visited by the user, always opens in de language that is set by the user's browser.
- Tip: put your own email address in the form and change the language settingto check this out.
- In case you have clients in other regions you can inform them in their own language.
- Clear form and Save defaults
- With the button Clear form you clear all values you have filled in this form.
- With the button Save defaults, you save all values you have filled in this form.
- If you like to clear the values you have saved before and start with a fresh form, then first press Clear form, then press Save defaults.
Topic revision: r5 - 2021-09-07 - RutgerRutgers
Ideas, requests, problems regarding TWiki? Send feedback

