Start-up Guide for Transport Commander
General Steps
- Order Entry (enter a transport order).
- Print (labels, manifests, bill of lading, CMRs etc.)
- Add Contacts (enter drivers, transporters, expeditors etc.)
- Dispatch (assign orders to contacts).
- EDI (send instructions, orders and EDI data to contacts (or to your own ERP systems)
- Follow (follow the progress of your orders (Track & Trace)
How to start
- Go to TransportCommander.com ( What is it? ).
- Choose Login from the Menu at the top of the page.
- Type your email address and your password.
No Login?
- If you already use CargoOffice or another FC-product, recognized by the
 logo, you can use the same login, you don't need to register.
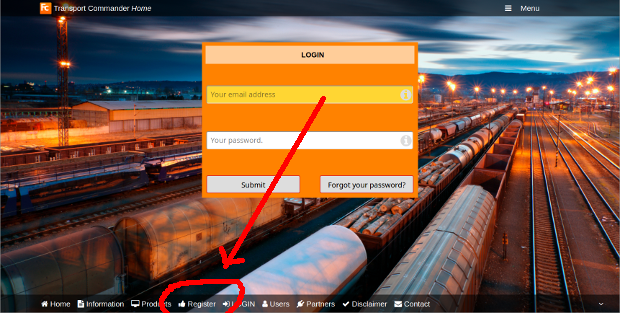
- Otherwise you need to register; use the Register link at the bottom of the page
- If you experience any problems, then please use the Contact link at the bottom of the page and ask us.
Order Entry
The next step is to enter a
transport order and assign it to a carrier.
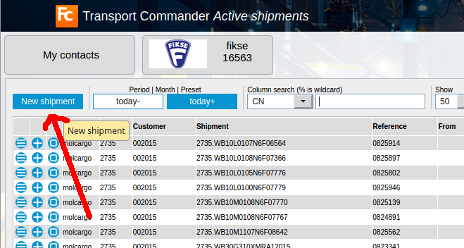
- Click the first button (New shipment) on the top left side of the page (the button under My contacts):
- The order entry form appears.
- The form should be pretty much self explanatory.
Pick-up and delivery addresses will be remembered in your private storage for future use and the data for the select boxes can be changed in your Settings (Menu -> Settings: Addresses).
- Example order entry form:
| |
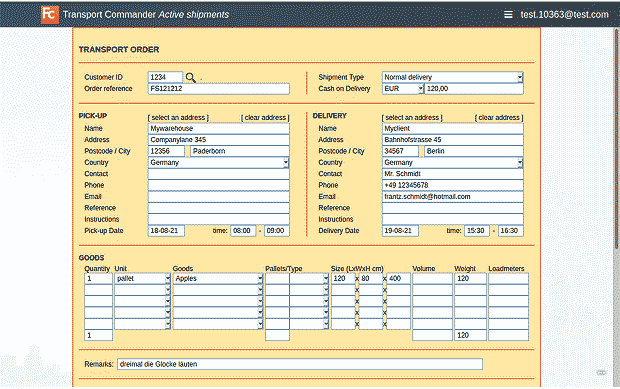 |
- Use the Submit button at the bottom of the page to store this order in your private storage.
- For a more detailed explanation of the order entry form see; OrderentryStart
- If you have any questions or require changes in this form, please use the Feedback option in your menu (Menu -> Feedback) and ask us. We have many ready to use templates for many different type of businesses.
- After entering an order you will see the order back on the main page. Each line has three buttons in front of it:
 Change the order
 Change the status of the order
 Print labels, manifests, bill of lading, CMRs etc.
Note: only for your own shipment  and
and  are available.
- Now, before we can Assign (send) this order to a transporter or a carrier, you have to enter these carriers and transporters into your private storage using the Contacts section. This is explained below.
Add Contacts
The next step is to enter your
Contacts (transporters, carriers, subcontractors and even your own drivers (if you have them).
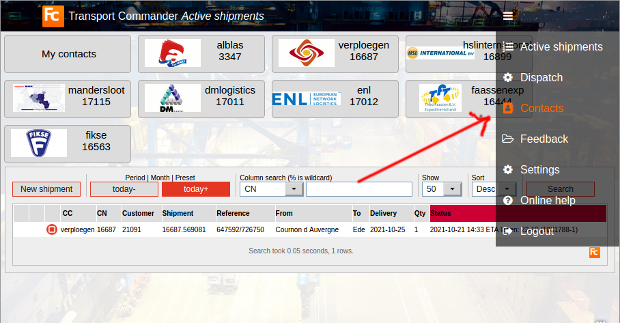
- Click the Menu button (upper right corner) and choose Contacts (Menu -> Contacts):
Find contact
The form below appears, allowing you to add contacts and companies:
- Type the email address, name or company name of your contact:
An Unknown Contact
If you see a message like:
Email address not found and the email address you typed in is correct, then the contact is probably not a member of the

community.
However, you can still add the contact:
- You can click: Click HERE to add it anyway and proceed from there.
- Note1: You can also use https://www.transportguide.info
 to find and add contacts (mainly transport providers). Login there with the same email address (= your user ID) and password.
- Note2: The
 community includes more than 1.5 million users and over 17.000 company members.
A Known Contact
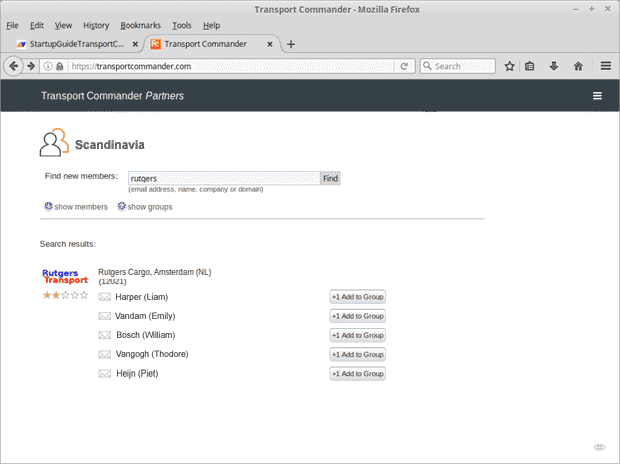
If your contact or his company is known in the community, you will see the name appear in the search results.
- Use the Add Contact button to add someone to your contacts.
- You can also create a Group and add your contact there, see: Network Contacts.
- Below is an example page to add a contact to a group named Scandinavia for specializedcarriers in that region.
Dispatch
Now you have entered your
Contacts we can Assign (send) orders to these contacts (transporters, expeditors, subcontractors or whatever contact you entered).
- The assignment of transport orders is called Dispatch.
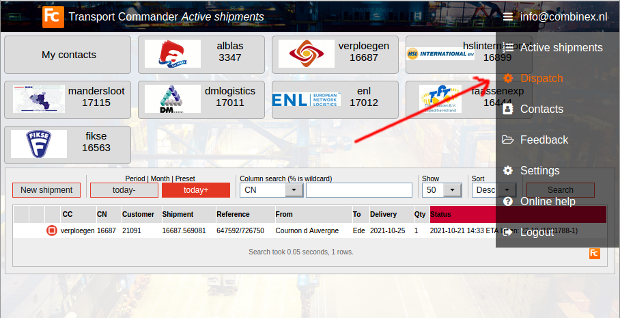
- Choose Dispatch from the menu (Menu -> Dispatch):
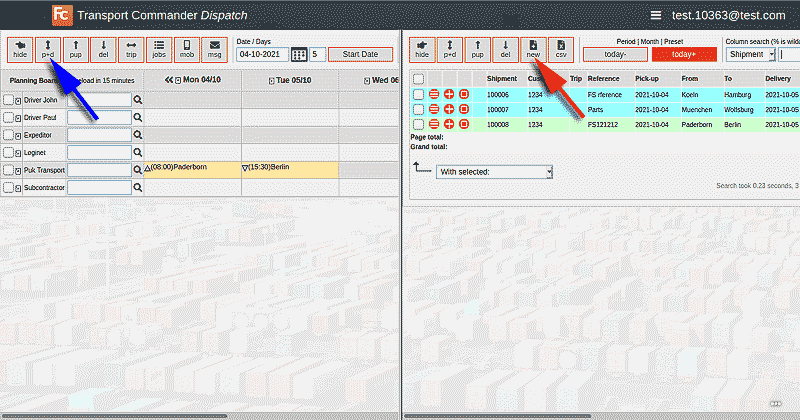
- The Dispatch / Planning page appears:
Explanation
- The main page shows a split screen, as you can see in the example above.
- The Left side shows your Contacts (drivers, transporters etc.)
- The Right side shows the jobs-to-do (orders).
- The order you entered earlier should visible be on the right side, otherwise go back to Order Entry or click the New button (red arrow in the example page above) to enter a new order.
- The general idea is to select one or more orders on the right and a contact on the left and then click the [p+d] button (blue arrow). [p+d] means pick-up and delivery.
- If you did it right, the left side of the page now shows two symbols, like in the example above. The symbol pointing up means a pick-up action and a symbol pointing down a delivery action.
EDI
- You might have noticed that you received an email by now, probably two emails.
- This is the result of the status change of the order, the status of the order is now assigned.
- The email contains the order instructions you can forward to your carrier, driver or subcontractor.
- You can change the layout and content of these emails, see: Statuses & actions in Menu -> Settings: Statuses & actions.
- If you look at this settings you will see two actions behind status assigned.
- Click on the action to change it, below some examples (try them):
- Example email here.
- Example email in HTML format here.
- The second email contains a file with order information that you can send to your carrier or subcontractor, should they accept EDI data for their TMS systems.
- There are file formats for all kinds of different TMS systems that your carrier or subcontractor might use.
- You can send each carrier or subcontractor their own required file format. Use Menu -> Feedback to tell us the formats you need.
- Or just tell us which carrier or contractor you use and we make sure they get the data and make sure you get a confirmation in return.
More info
- At this stage you might have a lot of questions, please do not hesitate asking. The best way to do this is by using the Feedback link from the main menu (Menu -> Feedback).
- If you want to know more about Dispatch and its possibilities then see the Dispatch & Planning page.
Follow (Track & Trace)
- You can receive status updates from your contractors and drivers which will be shown on the main page.
- Depending on your color setting (Menu -> Setting: Statuses & actions) , it will indicate whether everything is going alright or if there is a problem with a specific order.
- Status updates from contractors can be reported by email or by sending EDI files to you.
More about this here.
- Contractors can also send you PODs (Proof of Delivery) documents or signatures which will be attached to your orders.
Depending on how these contractors send you these PODs they need an email address or an FTP account into your Transport Commander account.
Use the Feedback button in the menu (top-right corner) and tell us what you need.
- Drivers can use their mobile phone to send status updates.
More about this here.
Again, use the Feedback menu item and let us know if you want to use this and we will set things up for you.
- There are numerous options to inform the recipient about the status of the shipment.
Messages can be sent automatically with a link to a screen which is updated with the latest status information.
See some examples of these screens here.
- Transport Commander has a lot more functionality than we can describe here.
Please let us know what you require. We probably have it and can implement it in minutes.
Please use the Feedback menu item and tell us what you need.
Credentials
Apart from contractors sending you status updates, you can also automatically pull status data directly from your contactors TMS system. Provided that you have a log-in at that contractor.
For this you need to add your
credentials to the respective contacts, as follows:
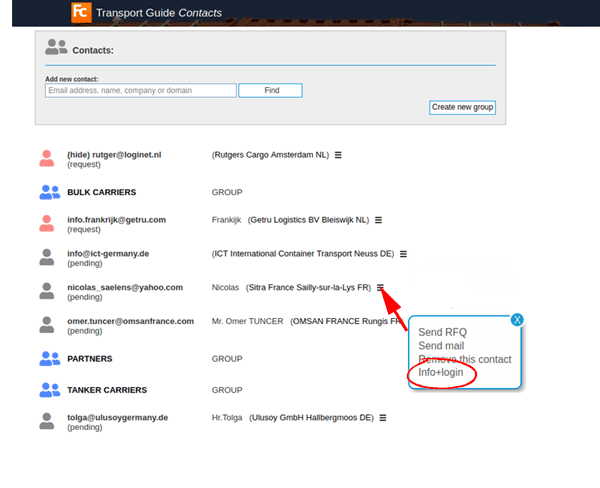
- Go to the Menu -> Contacts page, click on the small menu bar
 (three bars) next to your contact and choose Info+login.
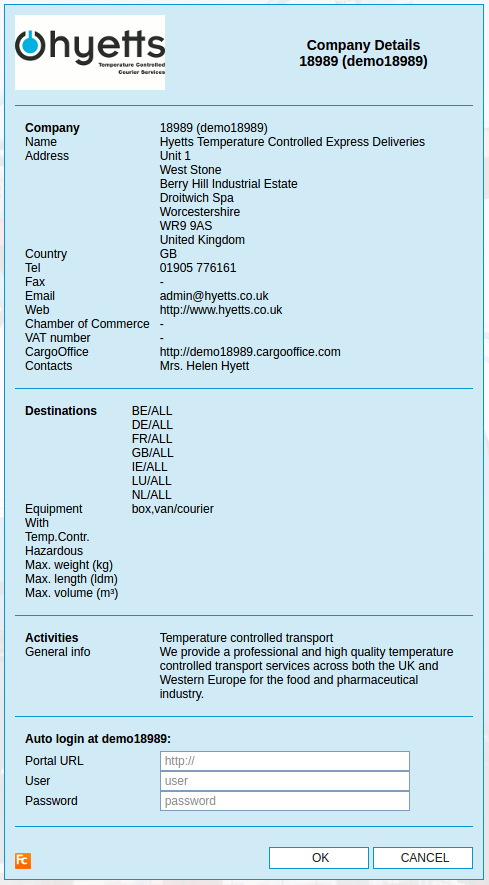
For example:
- The details of the contact appear on screen.
- Enter the User ID (always an email address) and password that contact gave to you.
Example:
- If your credentials are correct then you will see the active shipments on your main page.
- With Portal URL you can direct the button on the main page to any URL of your choice.
- If Portal URL is not filled, the button will link to the CargoOffice of this carrier.
- It can be directed to any orderentry system of your choice. Use Feedback if you want to know more.
Active Shipments
After adding your credentials at each contact, the system retrieves latest status from your shipments at these contacts.
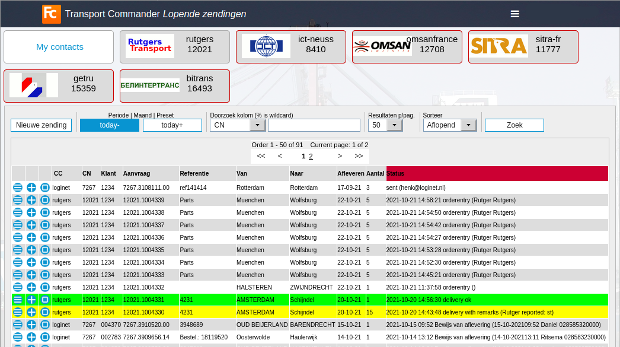
- Now you have a main page showing and tracking all your shipments at all your contacts.
- Below is an example page.
- The companies and their logo's are at the top of the page, followed by the shipments you assigned to them as well as the current status of those shipments.
- By clicking My contacts you see all the companies that are listed here with buttons.
With My contacts you can delete old contacts and new contacts.
- Use New shipment to add a shipment.
- Note: A red line around a logo means your credentials are not longer valid (or you didn't enter them). Shipments from these contacts can no longer be retrieved and can not be displayed here.
- Use the small documents button
 in front of each shipment to print documents like Manifests, Labels, CMR's, BoL's, etc.
Settings
More information or feedback
- Use the Feedback button in the menu (top-right corner) of the TransportCommander.com (Login -> Feedback)
- We wish you a lot of good business with TransportCommander.
- 000 -
 logo, you can use the same login, you don't need to register.

 Change the order
 Change the status of the order
 Print labels, manifests, bill of lading, CMRs etc.
 and
and  are available.

 to find and add contacts (mainly transport providers). Login there with the same email address (= your user ID) and password.
 community includes more than 1.5 million users and over 17.000 company members.
 (three bars) next to your contact and choose Info+login.
 in front of each shipment to print documents like Manifests, Labels, CMR's, BoL's, etc.


