Dispatch Howto
Content:- Dispatch Howto
- Where to find
- General description of the Dispatch Form
- Job Handling (right screen)
- Assigned jobs (left screen)
- Driver Handling
- Settings
Where to find
- The Dispatch System is in your Backoffice -> Dispatch
General description of the Dispatch Form
- The Dispatch Form shows a left frame and a right frame.
- The left frame shows the nodes with their assigned jobs and the right frame the jobs to do. Most often drivers are inserted as nodes, but nodes can also be cars, machines or parts.
- The aim is to assign jobs to nodes by selecting one or more jobs on the right and a node on the left and click one of the [dispatch] buttons.
- Both frames can be enlarged to the full width of the screen by dragging the divider-bar or by clicking the [ < ] or [ > ] buttons.
")
(click to enlarge)
")
Job Handling (right screen)
Add new jobs
- By using the [new job] button you can add new jobs to the right frame.
(Normally new jobs are entered by clients or are received by EDI).")
(click to enlarge)
")
How to assign jobs
- Select one or more jobs on the right and select a node on the left and click one of the [dispatch] buttons.
- There are 3 dispatch possibilities.
- Pickup
- Delivery
- Pickup and delivery
")
(click to enlarge)
")
Assigned jobs (left screen)
- For each assigned job two black triangles show op behind the drivers name, one for the pick-up and one for the delivery.
- If a "!" appears, there is a remark inside the transport order.
- The first three letters are marking the first three letters of the pickup/delivery city address. It is possible to change this setting inside the settings functions of dispatch.
- For distribution jobs it is possible to assign just the delivery. This reduces the number of triangles. Use one of the other two [dispatch] buttons for this purpose (it is also possible to assign just the pick-up).
- An assigned job automatically disappears from the right frame.
- When clicking on a triangle the Booking Details will appear.
Booking Details tells you i.e. all status information concerning this job. - If the driver uses a pda or onboard computer the colour of the triangles will change depending on the status of the job. Ultimately the colour green tells us that the job was successfully completed. Every other colour tells us that something is wrong.
Colours and statuses can be defined in: ShipmentStatus, #Recommended status color scheme. - Moving your mouse over one of the triangles shows more information about this job. If you want more or other information to be displayed, please contact your supplier or sent us a request by using your bug tracking system.
")
(click to enlarge)
")
Description of the planning board
- In the screen below most functionality about the planning board is described. Futher in this document more details are described.
")
(click to enlarge)
- 1. Takes you to the right (jobs) screen.
- 2. Dispatch buttons
- 3. This button shows the joblist for a particulair node. First you have to select a node before the joblist is shown.
- 4. By using the message-button you can sent a message to a selected node.
- 5. When using this button all jobs of selected nodes will be marked completed. Jobs which are marked "completed" or "done" will no longer been shown inside your planning board.
- 6. By clicking the calander you can display any date you like.
- 7. This brings you back to planning board of today.
- 8. Select the amount of days you want to display on your planning board. Dispatch is standard configured at 3 days, you can change this inside your settings.
- 9. When dragging your job to this pda-symbol, your transport order is added to the pda-screen (see below: "How to change the shipment status with help of the PDA-screen").
- 10. When dragging your job to this edit-symbol, you are able to edit this particuliar transport order.
- 11. When dragging your job to this symbol, you can remove the job from the planning board. This transportorder will pop up again at the right screen and is ready to be dispatched again.
- 12. In this column all nodes are displayed which have been created inside the drivers screen and are marked as dispatch node. (backoffice->dispatch->drivers). Please note that different types of nodes can be selected. A node can be a driver, a vehicle, a machine or an equipment part. In this example we have chosen to displaye vehicles.
- 13. When pressing the looking glass it is possible to add drivers, machines, parts, etc, to a particulair dispatch node. These additions are also nodes, but are not marked as dispatch node.
- 14. Days can be devided into a number of slots. These slots can be defined inside the dispatch settings (backoffice -> settings -> dispatch).
- 15. Browse backwards through the planning board, or forwards when using the blue arrow on the other side of this screen.
")
Drag a job to another day or to another driver
- It is possible to drag a triangle to another day. Just drop it on the small arrow symbol directly in front of the day name. The delivery date (or pick-up date) date will be changed accordingly.
- It is also possible to drag a triangle to another node. Just drop it on the small arrow symbol directly in front of the node's name. The delivery (or pick-up) will be assigned to the new node automatically.
- Please note that the pick-up triangle can be dragged independently from the delivery triangle and inadvertently be assigned to a different node. However, this might be exactly what the planner wants, for instance in cases where trailers are switched to other drivers.
")
(click to enlarge)
")
Un-assign jobs
- To un-assign a job from a node just 'drag' the triangle to the [remove] button in the right upper corner of the left frame. The job is not removed from the cargoOffice but shows up in the right frame again. It can be re-assigned to a different day or node.
")
(click to enlarge)
")
Update job
Change job details
- To edit the job details you can drag a triangle to the [edit] button which is next to the [remove job] button in the upper right corner of the left frame. The job details will appear and can be changed.
- In the right frame there is a small blue edit symbol which can be clicked to change job details from that frame.
")
(click to enlarge)
")
How to change the shipment status with help of the PDA-screen.
Planners have the ability to edit the status of each job.- Select a job and click the pda-symbol in the right-top-corner of the planning board screen.
- First you can chooce to make a direct change by using Shipment Status (see: ShipmentStatus) or Driver Status.
- When using Driver status you see the following screen:
")
(click to enlarge)
- 1. You see the details of the job you have selected.
Click report status. - 2. You see all dotcodes you have configured in DotCodes.
In this example we choose DNOK. - 3. You see an explanation about DNOK.
You have the ability to type some extra text.
Click OK. - 4. After some minutes you can see changes inside the planning screen.
If dispatch colours are defined in ShipmentStatus you can notice a different colour of this particulair job/triangle.
Inside the booking details (which you can view after clicking the specified triangle) you can notice a different status.
Note: Before taking effect you propably have to refresh the planning screen (i.e. right mouseclick refresh/reload this frame).
")
Add invoice- and profit-loss data
- Use the 'Update Job Details' procedure described before to call the 'job details' form.
- Click the 'profitloss' tab.
- Fill out the form and add charges and expenses for the job.
- The charges you enter will return on the invoice.
- For more information about the profit loss form, see: ProfitLoss
")
(click to enlarge)
")
Split a job
- Use the 'Update Job Details' procedure described before to call the 'job details' form.
")
(click to enlarge) - For more information about splitting jobs, go to: SplittingJobs.
")
Print job list
- When all jobs for a particular node are assigned, the driver job list can be printed.
- Select the node(s) and click the [droplist] button.
- The job list is template based. If you prefer other database fields displayed inside our standard template, then please contact your supplier or send us a request by using your bug tracking system.
")
(click to enlarge)
- The job list is template based. If desired another kind of joblist can be created. Read more in: JoblistTemplates.
")
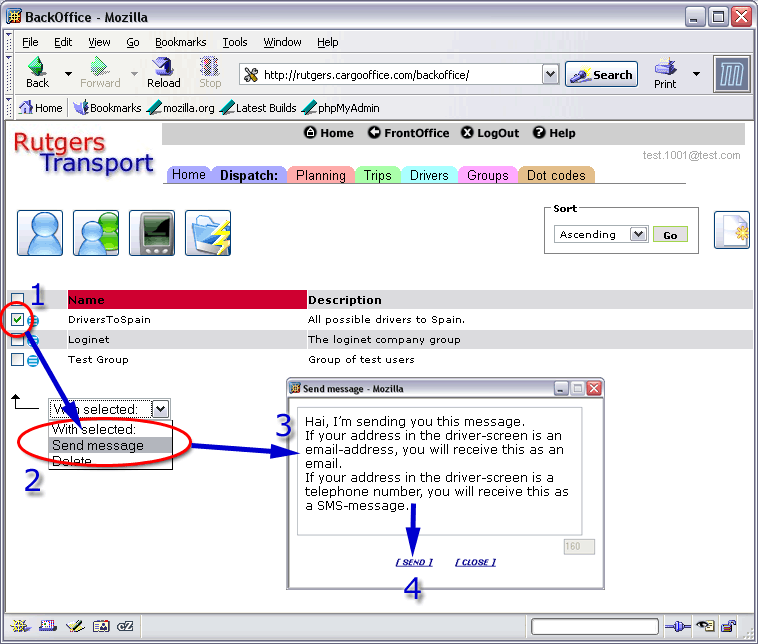
Send message to node
- At any time it is possible to send a message to a particulair node.
For example, a planner can send a message to the drivers sms-phone or PDA as well as an email address.
Note: The message is sent to the dispatch node, so the correct address inside the driverscreen for dispatchnodes should be filled (see below: Driver Handling). - Select the node(s) and click the [msg] button. Type message and press [send].
")
(click to enlarge)
")
Remove jobs from planning board
- When all jobs for a particular node are completed they can be removed from the planning board at once by marking the status of these transport orders as "completed".
- Select the node(s) who's trips can be closed and click the [done] button.
")
(click to enlarge)
")
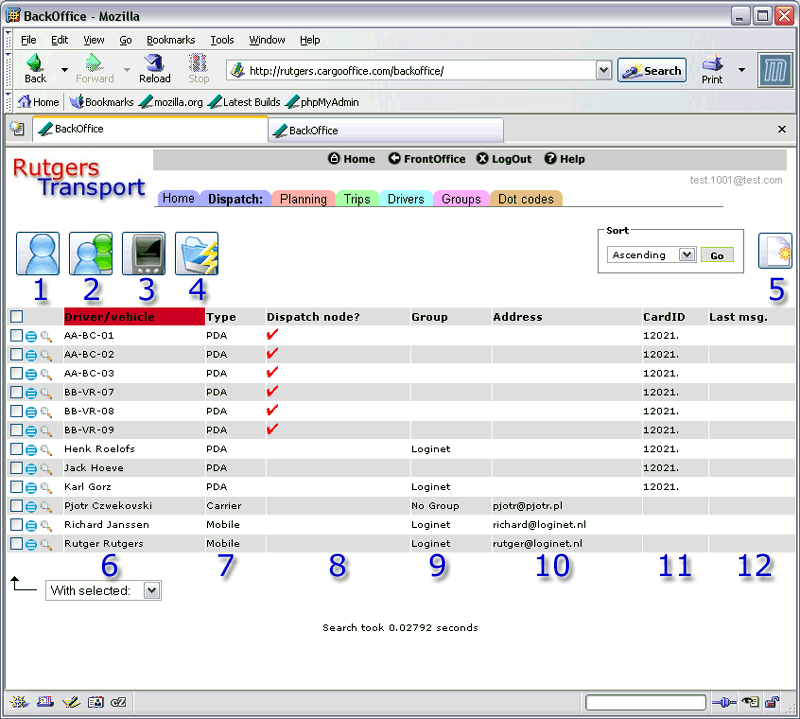
Driver Handling
Add new nodes
- You can add new nodes or edit existing nodes through the tab 'Drivers' on top of the screen.
")
(click to enlarge)
- By using the [add driver] button you can add new drivers.
- For editing the details of a driver, select a driver and hit the edit button.
- More information about how to maintain nodes and how to send messages you can find in NodesMaintenance.
")
Settings
Most of the data you want to show inside your dispatch system you can modify yourself by using your settings module: Backoffice -> Settings.Note: Before modifying you should be aware that wrongly configured settings can damage your cargoOffice performance.
If your not sure what to do, contact your supplier or send us a request by using your bug tracking system.
- The columns in the right frame are selectable, you can choose what data is displayed here: Backoffice -> Settings -> Parameters -> Track & Trace -> ttinfolistcolumns.
Note: modifying this table, will also change the display of your active shipments: Backoffice-> Shipments -> Active shipments - The columns in the left screen of your dispatch system can be modified in: Backoffice -> Settings -> Parameters -> Dispatch.
")
(click to enlarge)
- Note: Some of the above mentioned settings are also explained in ParametersDispatch.
")
-- RutgerRutgers - 20 Apr 2006


| I | Attachment | History | Action | Size | Date | Who | Comment |
|---|---|---|---|---|---|---|---|
| |
dispatch01.gif | r1 | manage | 99.0 K | 2006-04-10 - 08:54 | RutgerRutgers | dispatch overall screen |
| |
dispatch02.gif | r1 | manage | 113.0 K | 2006-04-10 - 09:06 | RutgerRutgers | Job list |
| |
dispatch03.gif | r1 | manage | 102.1 K | 2006-04-10 - 09:22 | RutgerRutgers | Howto dispatch |
| |
dispatch04.gif | r1 | manage | 61.6 K | 2006-04-10 - 10:42 | RutgerRutgers | left screen description |
| |
dispatch05.gif | r1 | manage | 54.0 K | 2006-04-10 - 11:26 | RutgerRutgers | left screen |
| |
dispatch06.gif | r1 | manage | 62.0 K | 2006-04-10 - 12:22 | RutgerRutgers | drag to another day or node |
| |
dispatch07.gif | r1 | manage | 55.9 K | 2006-04-10 - 12:27 | RutgerRutgers | Unassign |
| |
dispatch08.gif | r1 | manage | 70.1 K | 2006-04-10 - 12:41 | RutgerRutgers | Update job detail |
| |
dispatch09.gif | r1 | manage | 73.3 K | 2006-04-10 - 12:47 | RutgerRutgers | Profit loss |
| |
dispatch10.gif | r1 | manage | 77.6 K | 2006-04-10 - 12:59 | RutgerRutgers | split job |
| |
dispatch11.gif | r3 r2 r1 | manage | 64.0 K | 2006-04-10 - 13:43 | RutgerRutgers | Driver job list |
| |
dispatch12.gif | r1 | manage | 61.0 K | 2006-04-10 - 13:50 | RutgerRutgers | Send message |
| |
dispatch13.gif | r1 | manage | 68.5 K | 2006-04-10 - 13:57 | RutgerRutgers | Jobs completed |
| |
dispatch14.gif | r1 | manage | 76.8 K | 2006-04-10 - 14:16 | RutgerRutgers | Add / modify nodes |
| |
dispatch15.gif | r1 | manage | 76.6 K | 2006-04-10 - 14:40 | RutgerRutgers | nodes / drivers screen |
| |
dispatch16.gif | r1 | manage | 48.1 K | 2006-04-11 - 07:40 | RutgerRutgers | Message to driver groups. |
| |
dispatch17.gif | r1 | manage | 128.9 K | 2006-04-11 - 08:38 | RutgerRutgers | Dispatch settings |
| |
dispatch18.gif | r1 | manage | 103.5 K | 2006-04-20 - 09:29 | RutgerRutgers | PDA-screen |
Topic revision: r8 - 2006-07-10 - RutgerRutgers

|
|
|
|
Ideas, requests, problems regarding TWiki? Send feedback