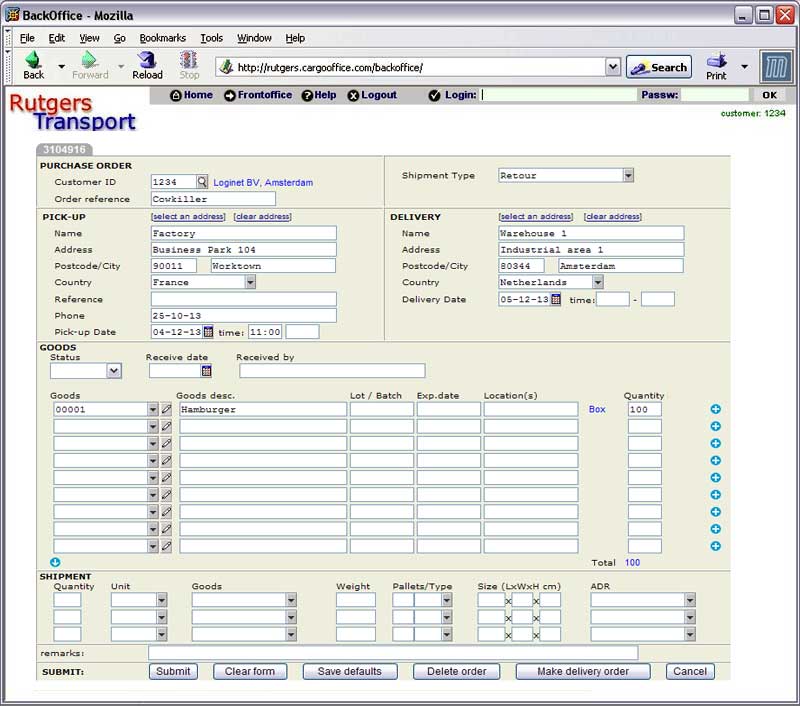
Enter a Receipt order
Warehouse receipt orders can be entered by your customers (front office) or by you (back office). A receipt order increases the
quantity expected of the products.
A daily receipt list can be printed from the receipt order list for the people in the warehouse to check that everything is complete when the goods arrive.
Any abnormalities are written on the receipt list as well as the location where the goods are stored. Then the receipt list goes back to the administrator who enters the abnormalities and the storage locations. He changes the status of the receipt order into 'received' which increases the
quantity in stock of the products and decreases the quantity expected.
This function can be found at:
- Frontoffice -> Warehouse -> Receipt order entry form
- Frontoffice -> Warehouse -> Receipt orders / receipt bookings -> button "New"
- Backoffice -> Warehouse -> Receipt order entry form
- Backoffice -> Warehouse -> Receipt orders / receipt bookings -> button "New"
Content:
The Receipt Order form

Some important functions
- Shipment type can either be 'Pick up' or 'Delivered'. Pick up means that the goods must be picked up at the producer or at the terminal. Delivered means that the goods will be delivered by the producer at your warehouse. If 'Pick up' is chosen then the lower part of the form needs to be filled so that the transport planner can arrange for the transport of the goods. In this case a transport order will appear in the planners active shipments list (see Dispatch & Planning).
- Products can be chosen by entering (part of) the productID or by using the gray arrow-down symbol next to each product. The gray arrow-down symbol shows a Product list from which the correct product can be chosen. Any new products can be entered directly from this product list.
- Product details can be changed using the gray pencil
 button (or edit-button in other templates).
- Quantity will appear on the receipt list so that the warehouse people know how much of the product they can expect. It will increase the Quantity Expected for the product on the inventory list.
- The blue arrow-down symbol
 below the product column gives you additional lines when needed.
- The blue plus symbol
 at the far right of each goods line copies the current line into the next line. This is for faster entry of the same product with different properties.
- The Save defaults button can be used to temporary store the form contents when you need to enter multiple orders with the same addresses. The current form content will be used as the default content for new orders, which of course can be changed as required.
- The Delete button can be used to remove an order.
- The Make delivery order button can be used when the status of the order is 'received'. The same order details will appear in a delivery order form for easy booking of a delivery order. The button is mostly used for cross docking applications.
Same product in different units
If a product is delivered in different units then the same product will show up multiple times in the product select window, each with a different unit. Be sure to select the product with correct unit when selecting a product. The chosen unit is displayed in the form:

- Note the description of the first goods line, the user added some comments here (blue text) to let the warehouse people know that each pallet contains 36 pieces.
Entering different batch, lot- or expiry dates
If the received products have different batch, lot- or expiry dates, you can use the
blue plus symbol

at the far right of each goods line to copy the goods line. Then you can enter the new properties into the new line which will create a new product in the database.
-
-
See also:
Book receipts
Next:
Enter delivery orders 
-
-000-

 button (or edit-button in other templates).
 below the product column gives you additional lines when needed.
 at the far right of each goods line copies the current line into the next line. This is for faster entry of the same product with different properties.


 at the far right of each goods line to copy the goods line. Then you can enter the new properties into the new line which will create a new product in the database.


