Trip Documentation
Trips can be created automatically or manually. A trip is created automatically when a job (a shipment) is assigned to a node (a driver). This is commonly used for full load orders.For distribution or groupage orders trips are created manually by combining several shipments into a trip and then assign the trip to a a driver. Index
Automatic creation of Trips
A trip is created automatically when a job (a shipment) is assigned to a node (a driver). This is commonly used for full load orders. Have a look at: How to assign jobs Once assigned, you can see the trips that are created in the trips list. The easiest way to show the trips list is by clicking the switch screen button. This switches the left side of the screen from planning to trips and vice versa:  |
- If a job is assigned to a driver and the driver already has a trip starting at the same date, then the job is added to that already existing trip.
- A job can also be assigned to an already existing trip by clicking the switch screen button (to show the trips) and then select a job and a trip and clicking one of the assign buttons.
Manual creation of Trips
1. Go to the dispatch system (Backoffice -> Dispatch) 2. Select one or more jobs-to-do on the right side of the dispatch screen and click the [assign] button, also in the right pane of the dispatch screen (do not use the [assign] button in the left pane). 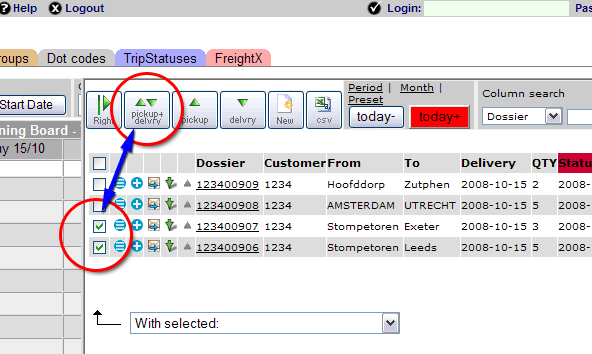 |
3. The trip form shows the assigned shipments, see the example below.
Each shipment is showing twice, one time for the pick-up and one time for the delivery.
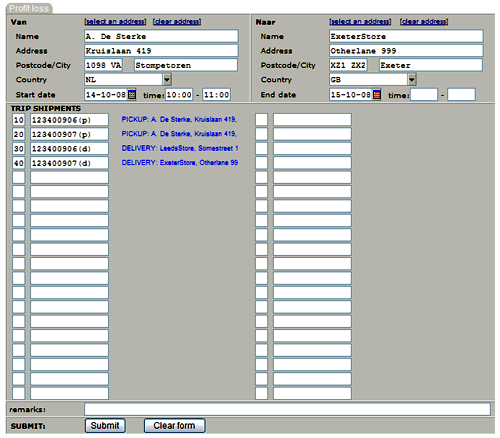 |
4. It is possible to change the sequence of the assigned shipments by modifying the number of the trip (in the first text box).
Note: By default the sequence of the job list is defined by date followed by sequence number.
 |
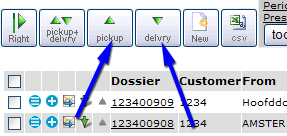
5. It is also possible to assign just a pick-up or just a delivery.
In that case use either the [assign pick-up] or [assign delivery] button in stead of the [assign] button.
 |
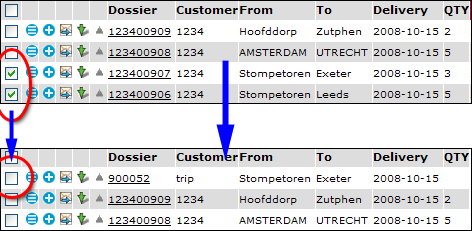
6. The assigned shipments are combined into a trip; instead of the shipment numbers you now see one trip number, beginning with a '9' digit, also called a 'tripShipment'.
 |
7.You are always able to change the trip back into it's original shipments.
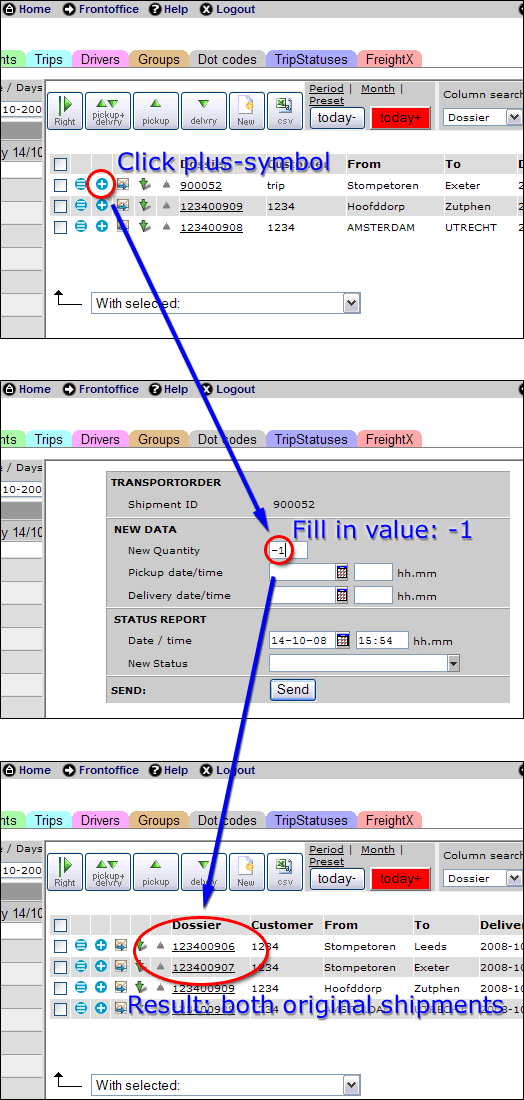 |
8. Finally, assign the trip to a node (driver or charter) by selecting the trip and a node and clicking the [assign] button in the left pane of the dispatch screen.
 |
9. The left pane will show a triangle for each shipment, see the DispatchDocumentation for details.
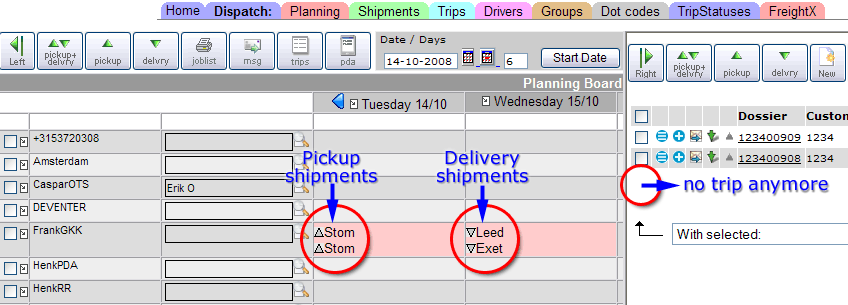 |
Sending trips to drivers or subcontractors
When a job or a trip is assigned to a driver or a subcontractor its status changes into "assigned".You can add an action to a trip or a job to send (for instance) the joblist to a subcontractor.
More information on shipment (job) statusses here and here.
And for trip statusses here.
Remove jobs from a trip
If a trip is assigned to a driver or a subcontractor, you can best remove the trip from the planning (showing it in the right pane again), click on the trip number and remove the pickup part (and/or the delivery part) by making the sequence number blank. As you then assign the trip to the driver or a subcontractor again, the status is again changed into 'assigned' triggering any actions added to that status again. You can also remove a job by using the Trip list (Backoffice -> Dispatch -> Trips).Click on the trip number and you see a form like this:
 |
If you have any actions attached to status 'assigned' you have to remove/assign it again to change the status into 'assigned' again to trigger the actions attached to status 'assigned' again.
Change the sequence of jobs in a trip
As you can see in the form above you can also change the sequence of events in a trip by using the blue 'move-up' or 'move-down' buttons.-- RutgerRutgers - 16 Oct 2008
| I | Attachment | History | Action |
Size | Date | Who | Comment |
|---|---|---|---|---|---|---|---|
| |
trip10.png | r1 | manage | 52.3 K | 2013-04-25 - 13:15 | RutgerRutgers | switch screen |
| |
tripDoc.gif | r1 | manage | 21.0 K | 2008-05-26 - 11:28 | RutgerRutgers | Trip Documentation |
| |
trips01.gif | r2 r1 | manage | 23.5 K | 2008-10-14 - 10:57 | RutgerRutgers | Assign shipments to create trips |
| |
trips02.gif | r1 | manage | 27.6 K | 2008-10-14 - 11:10 | RutgerRutgers | Trip created overview |
| |
trips03.gif | r1 | manage | 8.5 K | 2008-10-14 - 11:25 | RutgerRutgers | pickup and delivery buttons |
| |
trips04.gif | r1 | manage | 32.2 K | 2008-10-14 - 11:34 | RutgerRutgers | Assign the trip to a node |
| |
trips05.gif | r1 | manage | 34.3 K | 2008-10-14 - 11:57 | RutgerRutgers | triangle for each shipment |
| |
trips06.gif | r1 | manage | 16.0 K | 2008-10-14 - 12:15 | RutgerRutgers | assigned shipments combined into trip |
| |
trips07.gif | r2 r1 | manage | 12.9 K | 2008-10-14 - 12:35 | RutgerRutgers | Change sequence of assigned shipments |
| |
trips08.gif | r1 | manage | 62.9 K | 2008-10-14 - 14:08 | RutgerRutgers | Change the trip back into original shipments |
| |
trips09.gif | r1 | manage | 11.0 K | 2016-01-08 - 16:46 | HenkRoelofs |
Topic revision: r16 - 2020-02-18 - HenkRoelofs
Ideas, requests, problems regarding TWiki? Send feedback


