Add or modify nodes
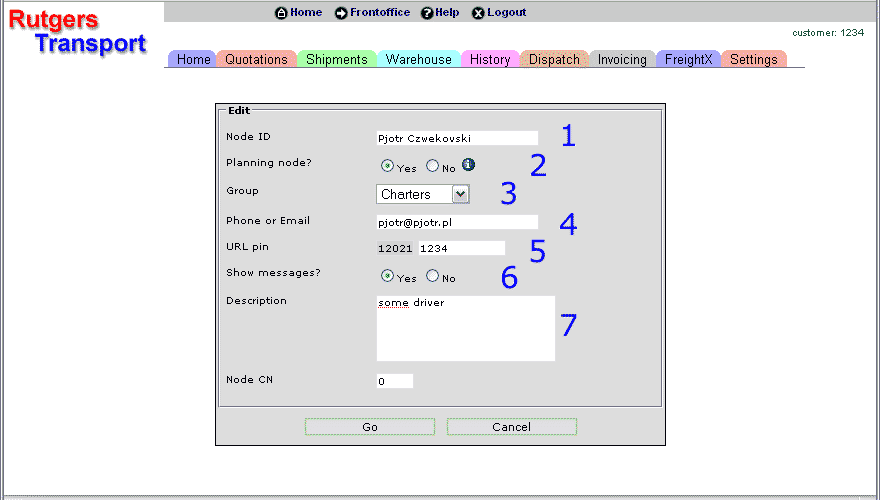
Drivers and other mobile entities are entered in the mobile nodes screen.- Go to: Backoffice -> Dispatch -> Drivers and click the [add node] button at the upper right corner of your screen.
- Or use the edit button to modify existing nodes.

(click to enlarge)
- 1. Node name.
Note: This does not have to be a driver. It can also be a vehicle, a trailer or a mobile data terminal. - 2. Decide if this node is a Planning node.
Planning nodes are displayed on the left side of the screen, other nodes do not show but can be assigned to a trip (like a truck to a driver or a trailer to a truck). - 3. Here you can link a node with a group.
To create groups go to: Backoffice -> Dispatch -> Driver groups. - 4. The phone or email address of the node (if applicable).
- This is used for messaging.
- For email: fill in an emailaddress, i.e. me@mycompany.com
- For phones: Fill in the international number, i.e. +31620812746.
- 5. URL pin: enter a unique (secret) number here that only the driver may know.
- This number can be used from mobile browsers (browsers on a PDA or a smartphone or browsers used in on-board computers) for easy access to jobs and statuses.
- Drivers can this URL to get access to their assigned jops::
- rutgers.cargooffice.com/mobile?1234 (where 1234 is the URL pin and rutgers is the company code)
- rutgers.cargof.com/mobile?1234 (shorter version)
- 6. Show messages: enter 'Yes' if you allow customers to see the messages between you and your drivers, normally this would be set to 'No'.
- 7. Description: some description of the node, e.g. the name of the driver, a license plate number or a trailer number.
- 8. Node CN: The carrier number of the node. Normally: 0.
This is only used when the node is owned by an other carrier which is also a Cargooffice user.
-- RutgerRutgers - 27 Sep 2006
Topic revision: r9 - 2013-04-25 - HenkRoelofs
Ideas, requests, problems regarding TWiki? Send feedback


