My Groups
About
- You can build your own community by creating groups and adding friends and partners to these groups.
- My Groups is thé community tool for anybody wishing to communicate with others inside the community.
- Currently this functionality is mostly used for receiving and sending Requests for Quotations.
- Please note: we are in the process of restyling this functionality.
Images that are displayed in this documentation could be changed already in our live versions.
Where to find
- Back Office -> Community Tools -> My Groups
By default this functionality is only available for level 20-users.
Description
- Every user inside Cargo Office is able to form his own groups with all users of his/her liking.
How to start
All groups are listed for the user that is logged in.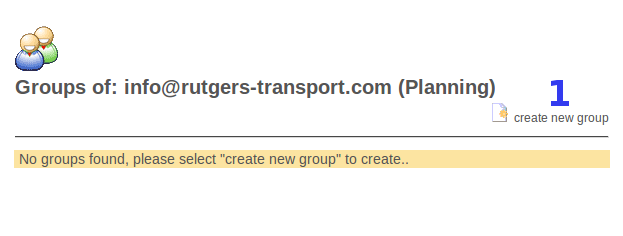
- 1. If no group exists, click " Create new group".
Create new group
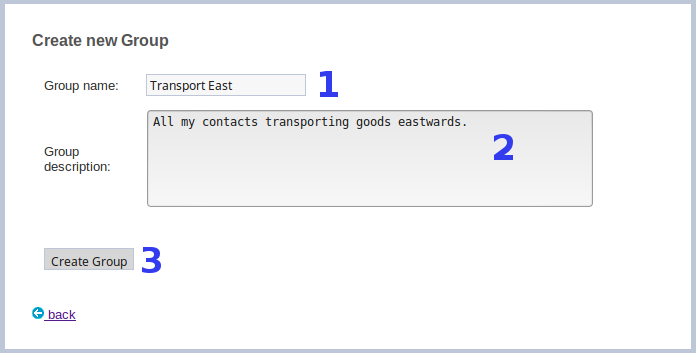
- 1. Enter a name for the new group.
- 2. Enter a description for this group.
Note: you are able to define multiple groups with multiple different users. You are able to add the same users in different groups. - 3. Create this group.
Note: you are able to modify details of this group later on.
Group overview
You are able to create as many groups as you like.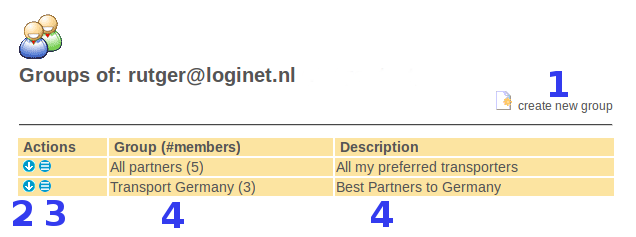
- 1. Create another group (above 2 that are already listed in this example).
- 2.
 If you click on this button, it:
- gives an overview of all users inside this group.
- gives you options to delete users or add new users to your group.
- 3.
 Gives you options to edit descriptions of your group details.
- 4. Descriptions of your group details.
Add users to a group
Users are added by adding their email address to a group.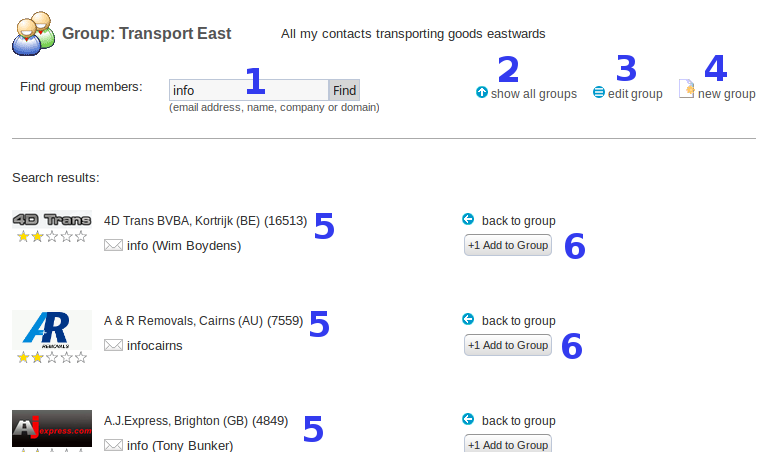
- 1. Find new group members: enter (part of) the name of a user or a company name and hit search.
- 2. Show an overview of all my groups.
- 3. Modify details of this group.
- 4. Create a new group.
- 5. Overview of search results per company.
- All listed results are users that are known inside the Cargo Office Community. If no result is shown, check description below.
- Note: There could be more than one user per company.
- 6. Add to group: hit this button to add the user to the new group.
When a user is not known inside the Cargo Office community
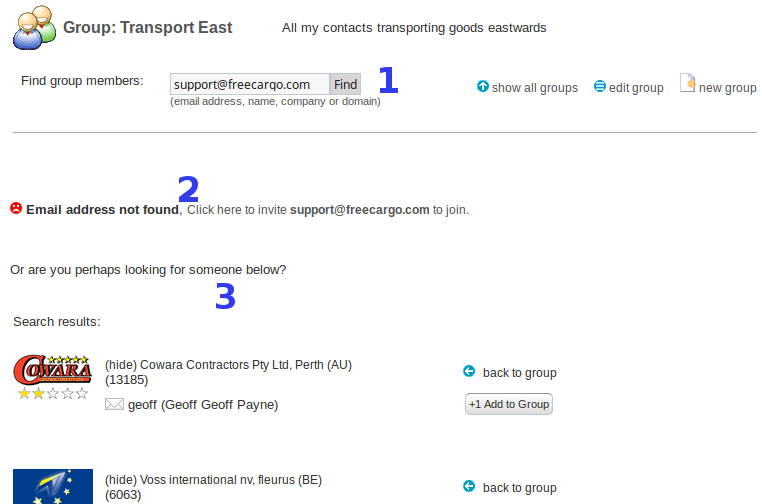
An example:
- 1. We are trying to find user: support@freecargo.com
- 2. Cargo Office replies this user can not be found, but it can be invited.
Note: if you invite this user, be sure this email address is correct. - 3. Cargo Office gives suggestions of other users that are known inside the community.
Invite unknown user

- 1. The invited user with his known email address is already listed. The name of the company the user is working for, is required.
- 2. The city where the user is situated, is required.
- 3. After clicking the invite button an email is sent to this user. When the user accept the invitation this user is added to the group (in this example group: Transport East of user info@rutgers-transport.com.
User overview inside a group and current functionality
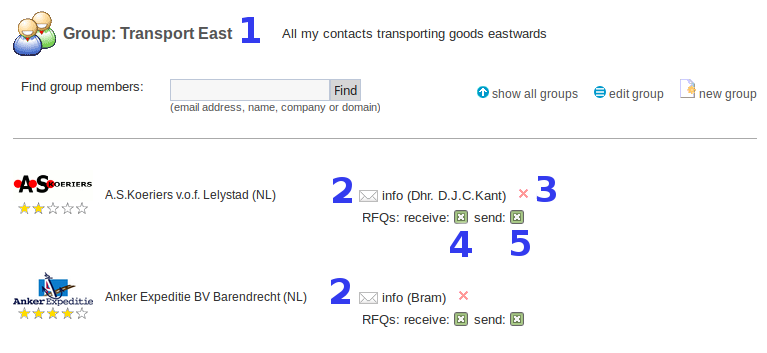
- 1. The name of this particular group.
- 2. All users that are combined inside this group.
- 3. Delete this user from this group (Transport East).
- 4. Use on/off option, if you want to receive Request For Quotations from this user.
- 5. Use on/off option, if you want to have an option to send Request For Quotations to this user.
Also read: how to send a RFQ.
Different types of users
Users of your group have options to decide wether thay want to be part of your group or not.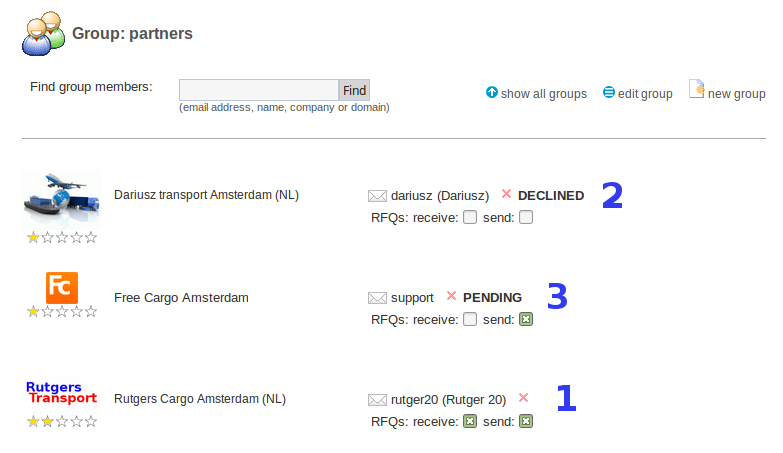
Therefore users inside a group can have different statusses:
- 1. ACCEPTED: those that have accepted your invitation are now part of your community.
- 2. DECLINED: those that have declined your invitation and are no part of your community.
- Users that declined your invitation have a label DECLINED behind their user name.
- If you want to sent this user a new invitation again, remove this user first by clicking the red x and then start invitation procedure again.
- 3. PENDING: those that have not reacted on your invitation and are no part of your community yet.
- Users that have not reacted on your invitation have a label PENDING behind their user name.
- These users are free to accept the invitation they have received by mail any time later on.
- If you want to invite this user again, My Groups Application will reply with the message it has already sent an invitation and it is waiting for user to reply.
- If the user can not find the email with the pending notification, delete this pending user by clicking the red x and then start invitation procedure again.
| I | Attachment | History | Action | Size | Date | Who | Comment |
|---|---|---|---|---|---|---|---|
| |
MyGroups01.png | r1 | manage | 15.6 K | 2016-07-18 - 10:53 | RutgerRutgers | HowToStart |
| |
MyGroups02.png | r1 | manage | 17.0 K | 2016-07-18 - 11:19 | RutgerRutgers | AddGroup |
| |
MyGroups03.png | r1 | manage | 61.4 K | 2016-07-18 - 12:26 | RutgerRutgers | AddUsers |
| |
MyGroups04.png | r1 | manage | 59.8 K | 2016-07-18 - 13:02 | RutgerRutgers | Unknown user |
| |
MyGroups05.png | r1 | manage | 21.0 K | 2016-07-18 - 13:21 | RutgerRutgers | Invite user |
| |
MyGroups06.png | r2 r1 | manage | 42.8 K | 2016-08-22 - 11:02 | RutgerRutgers | User overview inside a group |
| |
MyGroups07.png | r2 r1 | manage | 53.1 K | 2016-08-22 - 13:30 | RutgerRutgers | Group user types |
Topic revision: r7 - 2019-10-23 - RutgerRutgers
Ideas, requests, problems regarding TWiki? Send feedback


