Status actions edit screen
About
- Status actions are triggered when the status of a shipment or a trip changes.
- Generally they send an email, call an (external) URL, send an EDI file or add something to a shipment or a trip (like the time something happened).
Where to find
- Backoffice -> Shipments -> Shipment Statuses and Actions.
Description
- Before you can enter actions you must first enter the 'statuses' that your shipments might get (e.g. 'delivery ok', 'delivery delayed', 'order accepted', 'assigned to driver' etc.). To enter statuses use the 'new' button at the top of the form.
- To add an action to a specific status hit the small plus (
 ) button behind the status that you want to define the action for. (Red arrow in the the form below).

- You have the choice to create a Single Action or an Action Scheme.
- A Single Action does only one action, like sending an email for instance. However, you can enter multiple Single Actions which are all triggered when the shipment gets that particular status.
- An Action Scheme is a collection of actions with the possibility to jump between actions depending on certain conditions. In this case not all actions are necessarily triggered.
- When in doubt choose Single Action. Action schemes are slightly more difficult to understand.
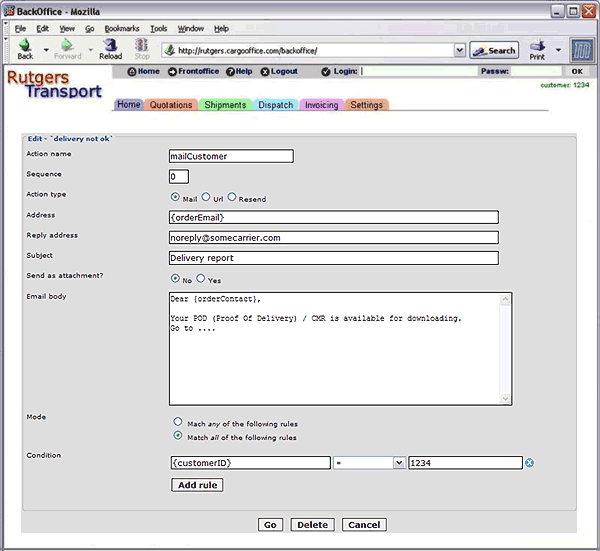
Single Action entry
The action entry form appears:
Description:
- Action name Enter a name for the action. Just use some meaningful name.
- Sequence (optional) If you enter more than one action for this status, you can enter the order in which this action should be executed.
- Action type Choose the type of action.
- A. E-mail (most used).
note: on request Cargo Office is able to add SMS-functionality. - B. URL, call a particular URL / post data to a page or a remote program. This is mostly used by programmers, some examples here
- C. Resend, (re)send order details to your TMS system.
- A. E-mail (most used).
- Address The (email) address the message is sent to or the URL that must be called, depending on Action type.
- note1: This can be a literal address, e.g.: you@yourcompany.com
or multiple addresses, which must then be entered as comma separated list (without spaces), e.g.: you@yourcompany.com,she@yourcompany.com,he@yourcompany.com - note2: If you use a ttmail address (ttmail.CN@cargooffice.com), you can only use 1 email address.
- note3: The number of email addresses is limited by the maximum length of this field (255).
- note4: You can use a database field here e.g. {orderEmail}, in this case the email address of the user who entered the shipment (see user details). If the order is entered on behalf of a customer by a user (with >= access lvl 20) the {orderEmail} is the email address of the first user of this customer.
Other examples of database fields: {pickupEmail} (email address belonging to the pick-up address), {deliveryEmail} (email address belonging to the delivery address) - note5: You can expand this field with cc: and/or bcc: to send a cc. For example:
you@yourcompany.com cc:she@yourcompany.com bcc:he@yourcompany.com
cc: and bcc: must be preceded by a space and be in lower case.
- note1: This can be a literal address, e.g.: you@yourcompany.com
- Reply address Enter your own email address here if you expect a reply to this email.
Note: There is also an option to add your own domain name as reply address.
This way you are able to advertise your services and makes it easier for clients to contact you.
This option involves some programming and extra costs. If interested contact Cargo Office programmers by using your Report system. - Subject The subject of the email message.
- Send as attachment? Send the email body as an attachment. This is useful if you need to send XML or CSV data to a remote host.
- Email body The body of the message.
In general it is possible to sent any message you want. Every database field known inside the order can be used. You have to put these names inside curly brackets "{}". Most fields you are using are displayed inside your orderentry screen. If you want to know the exact field names look here: Transport order fields. Or see some examples or contact your supplier.
Note :
It needs some specific skills to fill in the right data into an email body. First try to create a simple message. If you get stuck, our programmers are able to help you. Just sent us a request (by using your bugtracking system) what you want to sent. Also read: How to configure statuscodes and actions. - Condition One or more conditions that must be true before the action is fired. For example, a condition that only a specific customer will receive this message, which would be defined as something like this: {customerID} = 123456 or like this: {pickupDate} < eval(date("d-m-y"))
If you want to use the status of a shipment in a condition then it is best to use {lastStatus}. For example: {lastStatus} = delivery ok.
One of the condition methods is known as a Regular Expression.
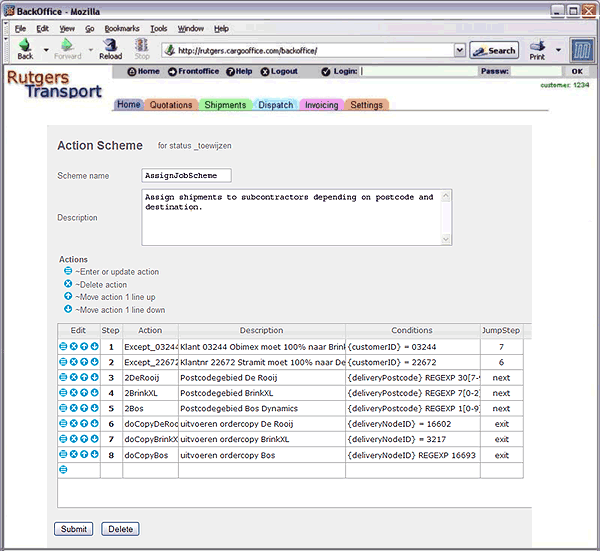
Action Scheme entry
The Action scheme entry form appears:
Description:
- Scheme name Enter a name for the scheme. Just use some meaningful name.
- Description (optional) Describe what this Action Scheme does.
- Actions Here you can enter the actions for the scheme:
 Enter/Edit Action Enter/Edit Action |
Enter a new action or edit an existing action. Clicking the button opens the action entry form much like the form described above |
|---|---|
 Delete/Remove Action Delete/Remove Action |
Delete the action from the Action Scheme |
 Move action up Move action up |
Move this action 1 line(step) up in the Action Scheme |
 Move action down Move action down |
Move this action 1 line(step) down in the Action Scheme |
- Jumping between steps: In the action entry form that appears when you click the blue edit button, you can enter a 'jump to step' field. When the condition of the action is true then the program jumps to this step and skips any inbetween steps. When the action is false then the program continues with the next step in the scheme.
You can also enter 'next' or 'exit' in the 'jump to step' field. 'Next' means that the program continues with the next step in the scheme, 'exit' means that the scheme stops and no further actions are executed (only when the condition is true of course). - Warning: Moving actions up or down do not change the jump to step field. You must change this manually by editing the action (using the blue edit button).
- Warning: Be careful when jumping back in the scheme to a previous step.This might cause an infinite loop.
Other info on Status Actions
- How to configure statuscodes and actions
- Examples:


| I | Attachment | History | Action | Size | Date | Who | Comment |
|---|---|---|---|---|---|---|---|
| |
butarwdn.gif | r1 | manage | 0.1 K | 2014-01-24 - 16:04 | HenkRoelofs | |
| |
butarwup.gif | r1 | manage | 0.1 K | 2014-01-24 - 16:04 | HenkRoelofs | |
| |
butdelete.gif | r1 | manage | 0.2 K | 2014-01-24 - 16:02 | HenkRoelofs | |
| |
butedit.gif | r1 | manage | 0.2 K | 2014-01-24 - 16:02 | HenkRoelofs | |
| |
plus.gif | r1 | manage | 0.1 K | 2014-01-23 - 15:49 | HenkRoelofs | |
| |
status2b.gif | r4 r3 r2 r1 | manage | 38.9 K | 2014-01-24 - 16:58 | HenkRoelofs | Status code entry form |
| |
status3.gif | r7 r6 r5 r4 r3 | manage | 36.9 K | 2014-01-24 - 13:55 | HenkRoelofs | Edit T&T Actions |
| |
status4.gif | r1 | manage | 46.4 K | 2014-01-24 - 15:56 | HenkRoelofs |
Topic revision: r25 - 2021-03-30 - HenkRoelofs

|
|
|
|
Ideas, requests, problems regarding TWiki? Send feedback