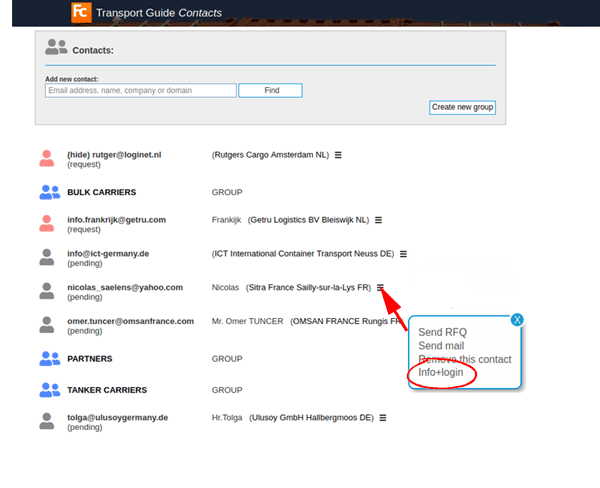
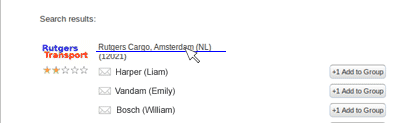
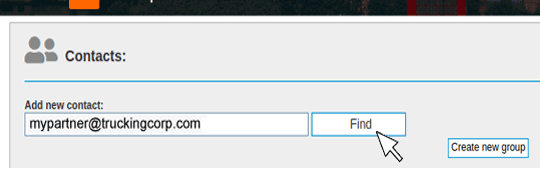
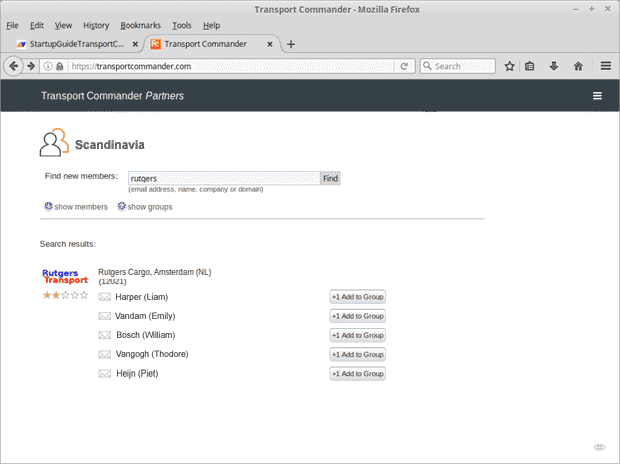
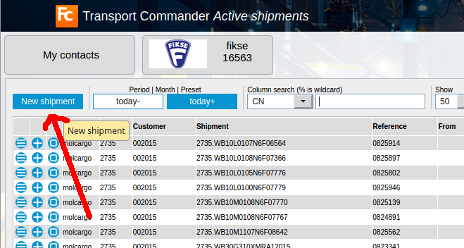
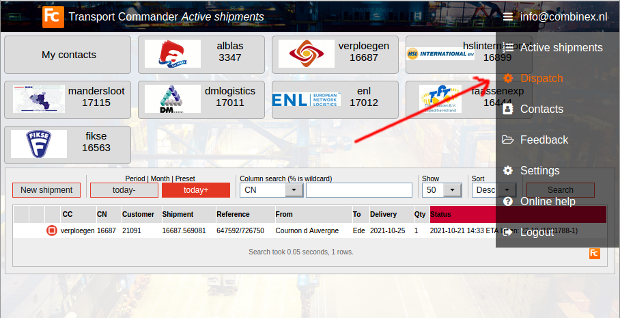
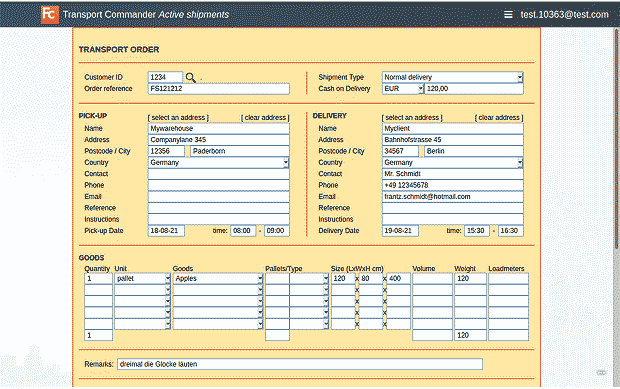
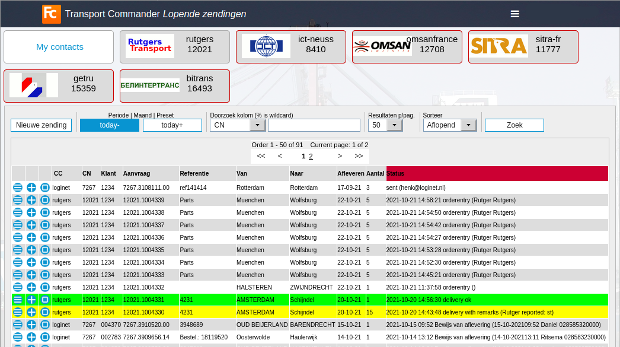
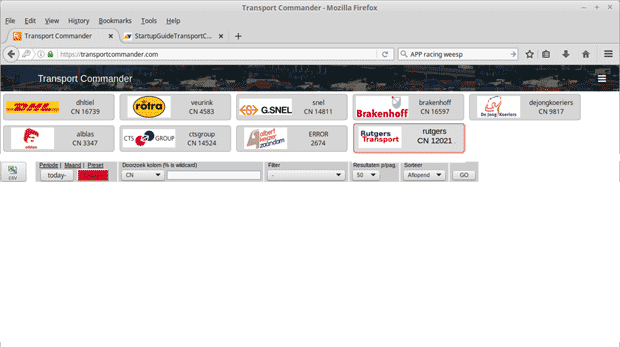
---++ Start-up Guide for Transport Commander ---+++ Steps 1 *Register* (button at the bottom of the screen). 1 *Add Contacts* (enter the *carriers* and *subcontractors* you monitor). ---+++ How to start (long version) * Go to *TransportCommander.com* ( [[TransportCommander][What is it? ]]). * Choose *Login* from the Menu at the top of the page. * Type your *email address* and your *password*.   *No Login?* * If you already use !CargoOffice or another FC-product, recognized by the <img alt="freecargo_logo_16.png" height="16" src="%ATTACHURL%/freecargo_logo_16.png" title="freecargo_logo_16.png" width="16" /> logo, you can use the same login, you don't need to register. * Otherwise you need to *register*; use the Register link at the bottom of the page | | <img alt="tc_login_register.png" height="327" src="%ATTACHURL%/tc_login_register.png" title="tc_login_register.png" width="620" /> | * If you experience any problems, then please use the *Contact* link at the bottom of the page and ask us. ---+++ Order Entry The next step is to enter a *transport order* and assign it to a carrier. Click the button on the top left of the page (the button that shows your company name and logo): | | <img alt="tc_main_orderen.png" src="%ATTACHURL%/tc_main_orderen.png" title="tc_main_orderen.png" /> | The *order entry form* appears.<br /><br />The form should be pretty much self explanatory. <br />Pick-up and delivery addresses will be remembered in your private storage for future use and the data for the select boxes can be changed in your *Settings* (Menu->Settings). Example *order entry* form: | | <img alt="tc_order_1.png" src="%ATTACHURL%/tc_order_1.png" title="tc_order_1.png" /> | Use the *Submit* button at the bottom of the page to store this order in your private storage. For a more detailed explanation of the order entry form see; OrderentryStart If you have any questions or require changes in this form, please use the *Contact* link and ask us. We have many ready to use templates for many different type of businesses. Now, before we can *Assign* (send) this order to a transporter or a carrier, you have to enter these carriers and transporters into your private storage using the *Contacts* section. This is explained below. ---+++ Add carriers, subcontractors and other contacts The next step is to enter your *Contacts* (transporters, carriers, subcontractors and even your own drivers (if you have them).<br /><br /> * Click the *Menu* button (upper right corner) and choose *Contacts*: | | <img alt="tc_menu_parners.png" height="375" src="%ATTACHURL%/tc_menu_contacts.png" title="tc_menu_contacts.png" width="620" /> | ---++++ Find contact The form below appears, allowing you to add contacts and companies: * Type the email address, name or company name of your contact: | | <img alt="tc_find_contact.png" src="%ATTACHURL%/tc_find_contact.png" title="tc_find_partner.png" /> | ---++++ An Unknown Contact If you see a message like: <strong>Email address not found </strong>and the email address you typed in is correct, then the contact is probably not a member of the <img alt="freecargo_logo_16.png" height="16" src="%ATTACHURL%/freecargo_logo_16.png" title="freecargo_logo_16.png" width="16" /> community. However, you can still add the contact:<br /><br />you can click: *Click HERE to add it anyway* and proceed from there. *Note1:* You can also use https://www.transportguide.info to find and add contacts (mainly transport providers). Login there with the same user ID and password. <b>Note2: </b>The <img alt="freecargo_logo_16.png" height="16" src="%ATTACHURL%/freecargo_logo_16.png" title="freecargo_logo_16.png" width="16" /> community includes more than 1.5 million users and over 17.000 company members. ---++++ A Known Contact If your contact or his company is known in the community, you will see the name appear in the search results.<br /><br /> * Use the *Add Contact* button to add someone to your contacts. * You can also create a *Group* and add your contact there, see: NetworkContacts. * Below is an example page to add a contact to a group named *Scandinavia* for specializedcarriers in that region<b>.<br /></b> | | <img alt="tc_find_result.png" height="464" src="%ATTACHURL%/tc_find_result.png" title="tc_find_result.png" width="620" /> | ---+++ Dispatch Now you have entered your *Contacts* we can Assign (send) orders to these contacts (transporters, expeditors, subcontractors or whatever contact you entered). The assignment of transport orders is called *Dispatch* and is explained below. Choose *Dispatch* from the menu: | | <img alt="tc_menu_dispatch.png" src="%ATTACHURL%/tc_menu_dispatch.png" title="tc_menu_dispatch.png" /> | At the top of the main page you will see your own button.<br />Clicking on that shows an *order entry form* to enter an order. - same from dispatch form - shows op under CN - assign to contact - send order to contact - send EDI file to contact <br /><br />From these entered shipments, you can: * print documents like CMR's, labels, !BoL 's, etc * receive an order file (in the format you prefer) which you can import in another software system or Excel, etc. * send a copy of the order to another company. All functionality can be addressed or styled accoriding your wishes, just send us some feedback.<br />The values of the dropdowns in your order entry form you can alter in your settings. ---++++ Credentials Going back to the *main page*, you will now see buttons on top of the screen for each contact you added.<br />For example something like this: | | <img alt="tc_shipments_1.png" src="%ATTACHURL%/tc_shipments_1.png" title="tc_shipments_1.png" /> | <br />Click on a button to open the *web page* of that company. There you can enter new orders and track your shipments.<br /> <br />However, it is also possible to show these shipments here on this page, below the buttons. <br />This way you can keep track of all your shipments at all your contacts here on this page.<br /> <br />For that you need to add your *credentials* to the respective contacts, as follows: * Go back to the *Contacts* page, click on the small menu bar<img align="bottom" alt="clickbars.gif" src="%ATTACHURLPATH%/clickbars.gif" style="vertical-align: middle;" /> (three bars) next to your contact and choose <b>Info+login.<br /></b>For example: | | <img alt="contacts2.png" src="%ATTACHURL%/contacts2.png" title="contacts2.png" /> | The *details* of the contact appear on screen. * Enter the *User ID* and *password* that contact gave to you. Example: | | <img alt="tc_credentials_addPW.png" height="625" src="%ATTACHURL%/tc_credentials_addPW.png" title="tc_credentials_addPW.png" width="474" /> | * If your credentials are correct then you will see the active shipments on your main page. ---++++ Active Shipments After adding your credentials at each contact, the system retrieves latest status from your shipments at these contacts.<br />Now you have a main page showing and tracking all your shipments at all your contacts. Below is an example page. <br />The companies and their logo's are at the top of the page, followed by the shipments you assigned to them as well as the current status of those shipments. | | <img alt="tc_shipments.png" src="%ATTACHURL%/tc_shipments.png" title="tc_shipments.png" /> | *Note:* A red line around a logo means your credentials are not longer valid (or you didn't enter them). Shipments from these contacts can no longer be retrieved and can not be displayed here. Use the small *documents* button <img alt="button_actions_1001.png" height="16" src="%ATTACHURL%/button_actions_1001.png" title="button_actions_1001.png" width="16" /> in front of each shipment to print documents like Manifests, Labels, CMR's, !BoL's, etc. ---+++ Settings [[SettingsTransportCommander][Click here for all Transport Commander settings]] ---+++ More information or feedback Use the Feedback button in the menu (top-right corner) of the !TransportCommander.com (Login -> Feedback)
Attachments
Attachments
Topic attachments
I
Attachment
History
Action
Size
Date
Who
Comment
png
button_actions_1000.png
r1
manage
0.6 K
2021-09-22 - 15:08
HenkRoelofs
png
button_actions_1001.png
r1
manage
0.6 K
2021-09-22 - 15:08
HenkRoelofs
gif
clickbars.gif
r1
manage
0.1 K
2021-03-22 - 14:04
HenkRoelofs
png
contacts2.png
r3
r2
r1
manage
27.4 K
2021-03-22 - 15:29
HenkRoelofs
png
freecargo_logo_16.png
r1
manage
0.6 K
2021-09-21 - 12:22
HenkRoelofs
png
tc_click_company.png
r1
manage
5.9 K
2016-11-11 - 15:27
HenkRoelofs
png
tc_company_details.png
r1
manage
27.2 K
2016-11-11 - 16:15
HenkRoelofs
png
tc_credentials_addPW.png
r1
manage
63.6 K
2021-03-23 - 14:20
RutgerRutgers
add pw credentials
png
tc_find_contact.png
r3
r2
r1
manage
9.9 K
2021-03-15 - 15:54
HenkRoelofs
png
tc_find_result.png
r2
r1
manage
17.1 K
2021-09-23 - 14:32
HenkRoelofs
png
tc_main_orderen.png
r1
manage
11.2 K
2021-09-24 - 13:36
HenkRoelofs
png
tc_menu_contacts.png
r1
manage
69.4 K
2021-03-15 - 15:17
HenkRoelofs
png
tc_menu_dispatch.png
r1
manage
18.4 K
2021-10-04 - 10:26
HenkRoelofs
png
tc_order_1.png
r2
r1
manage
25.9 K
2021-09-24 - 13:56
HenkRoelofs
png
tc_shipments.png
r2
r1
manage
54.4 K
2016-11-11 - 16:36
HenkRoelofs
png
tc_shipments_1.png
r2
r1
manage
30.4 K
2021-09-22 - 12:50
HenkRoelofs
This topic: Cargooffice
>
AboutFreecargo
>
FreightExchangeHowto
>
WebHome
>
FreecargoProjects
>
PublicationDocs
>
StartupGuideTransportCommander
Topic revision: r35 - 2021-10-04 - HenkRoelofs
Copyright © 2008-2026 by the contributing authors. All material on this collaboration platform is the property of the contributing authors.
Ideas, requests, problems regarding TWiki?
Send feedback

