Start-up Guide for TrackTrace.Info
How to start (Login version)
|
 |
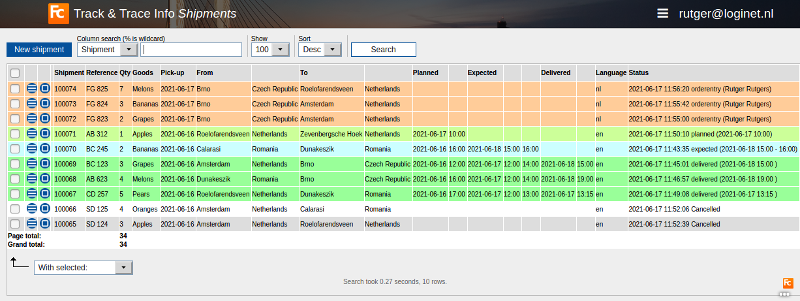
If there are no shipments yet, just simply click the button: New shipment (top left of the screen).
 |
| |
Edit button; open the Track and Trace form for editing |
| |
Tasks button; things you can do with this shipment, like printing documents |
How to add a shipment (short version)
- Press the New shipment button on the top left of the screen to add a new shipment.
- See full description and explanation of this screen here (long version).

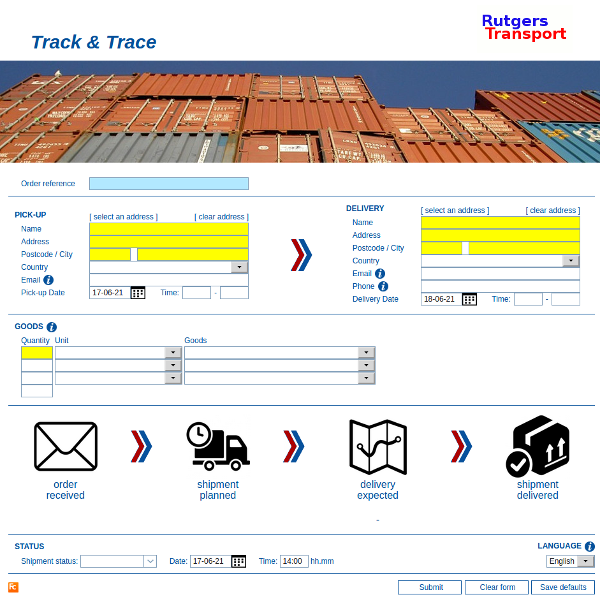
- Fill in the pick-up and delivery details of your shipment.
- The email addresses for pick-up and delivery will automatically receive messages.
- The type of message varies depending on the status you set on the bottom of the page (and wether it is a pickup or delivery address).
- Tip: when you enter your first shipment put your own email address here, so you can check what kind of message you are sending.
- In the message you are sending there is a link which opens a screen that shows the exact status of your shipment.
LINK to TT-screen
- The type of message varies depending on the status you set on the bottom of the page (and wether it is a pickup or delivery address).
- All addresses you enter will be saved automatically, so you can re-use them again by [select an address] or typing the first characters in the Name field.
- The values of the select boxes in the goods details you can alter by clicking Menu on the top right of your screen and choose: Settings.
- Every time you submit a form a specific status is set.
- By default there are 4 statusses available corresponding with the symbols: order received, shipment planned, delivery expected and shipment delivered.
LINK
- By default there are 4 statusses available corresponding with the symbols: order received, shipment planned, delivery expected and shipment delivered.
- Every status that is set when the form is submitted, can trigger messages.
- You can set different dates and times per status.
- These dates and times will automatically appear on the screen that is sent by your email messages.
- In which language your message is sent can be controlled by the language you set in the top bottom part of your form.
- You can set different dates and times per status.
- After you have submitted the form, you are brought back to the Shipments screen.
There you'll notice:
- The newly added (or edited) shipment.
- The newly added dates and times for Planned, Expected and Delivered.
More about the statusses and the messages you can sent.
LINKDescription of shipments screen
LINKHow to add documents
- Go
Menu functionality
- Go
More information
LINKHow to start (quick version)
- Go to tracktrace.info
- Add your details, and do what you want.
(more info later) - That's all and it's free!
- Please consider opening an account, your benefits are:
- Different statusses; e.g. : (arrival depot, depart depot, delay, etc).
- You can send different messages.
- More goods lines.
- Options te send text-messages on specific statusses.
- Options to send messages on different statuses.
- Options to restyle your Track & Trace page.
- Options to show your Track & Trace page and messages in different languages.
- All your orders are stored for a year so you can retrieve or reuse them again.
- Addresses will be remembered so that you don't have to enter them again and again.
- Printing labels to put on your pallets and boxes.
- Your own Logo on your Trac&Trace page, CMRs and labels.
- Many options to import EDI-files of multiple shipments.
- Options to have your Track & Trace page restyled by a designer of your choice.
- Options to have your Track & Trace page included into any website of your choice.
- Options to link your Track & Trace -system to other software applications and to display their shipments.
- Options to automatically calculate estimated delivery times (or other times).
- Options to connect our driver app to your TrackTraceInfo system. (incl. a recipient signature as proof of delivery).
- Send and receive messages from your own email domain.
- Add POD-documents, so the sender has proof his goods are delivered.
- Use the Contact link at the bottom of the screen if you are interested in an account.
Extra info
- On request we can create additional (FTP) options so you can add POD-documents and the sender has proof his goods are delivered (this includes an additional fee per month).
- Sending and receiving messages from your own email domain (this includes an additional fee per month).
This topic: Cargooffice > AboutFreecargo > FreightExchangeHowto > WebHome > FreecargoProjects > PublicationDocs > StartupGuideTrackTraceInfo
Topic revision: r4 - 2021-06-17 - RutgerRutgers
Ideas, requests, problems regarding TWiki? Send feedback