Using mobile phones
What you can do with mobile phones
- Inform drivers about trips, addresses, pick-ups and deliveries.
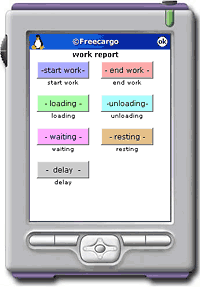
- Accept driver reports on work hours, resting times etc.
- Accept trip- and shipment statuses (picked-up, delivered, delayed etc.)
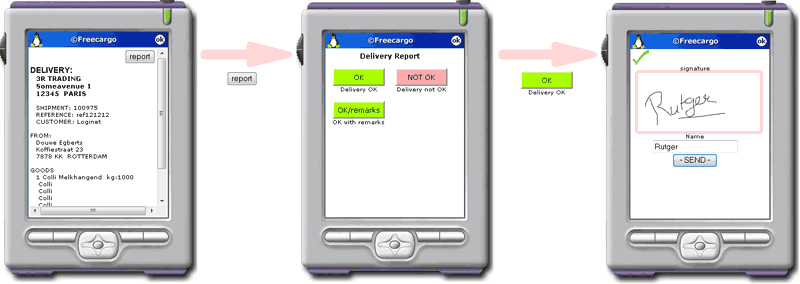
- Accept electronic signatures from addressees (Proof Of Delivery).
- Cross docking in warehouses (scan incoming and outgoing shipments and their (temporary) location in the warehouse)

- The device sends shortcodes to cargoOffice (so called 'dot-codes'). Nothing happens unless some actions are defined for these dot-codes, e.g. change the status of a shipment or book work hours. For detailed information on dot-codes see: DotCodes
Device requirements
- Internet browser (HTML 5 compliant for signature capture)
- Internet connection (WiFi, GRPS, HSDPA, UMTS etc)
- Barcode scanner (optional)
- Flash player (optional, needed to accept signatures on older style devices) (http://www.adobe.com/products/flashplayer_pocketpc/downloads/player.html
 )
)
Getting started
- Create at least 1 driver
- Assign a job to the driver
- Show assigned job on the device
Create at least 1 driver
- Go to your Backoffice and choose 'Drivers' from the Dispatch menu.
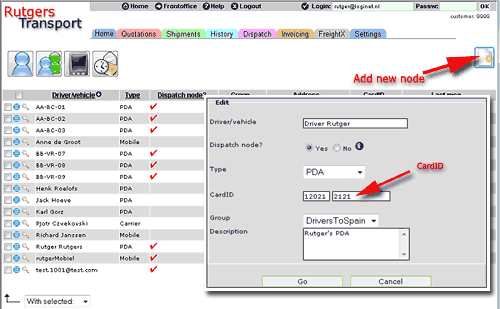
- Click the 'Add new node' button (drivers are called 'nodes' in cargoOffice, like nodes in a network):

- Enter the drivers 'Name'.
- Enter a unique CardID *
- Many on-board computers have a unique 'CardID' or 'Address'.
- If your device doesn't have a CardID or if you don't know what we are talking about then just type a unique number here (we'll use it later).
- Regard CardID as a sort of security code or PIN code. Use at least four digits, keep it secret and don't use easy numbers like 0000 or 9999.
- Full information about Nodes see: NodesOverview
Assign a job to the driver
- Go to your Backoffice and choose 'Dispatch' from the Dispatch menu.
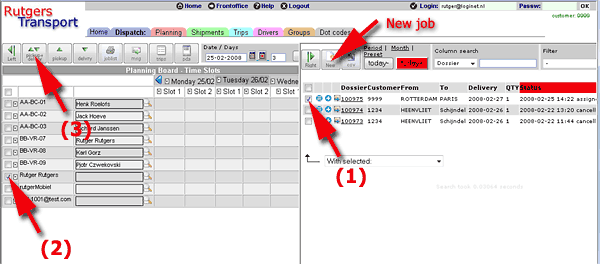
- Click the 'New job' button and enter a new job (or use an existing job from the list).
- (1) Check the new job in the right panel.
- (2) Check the driver in the left panel.
- (3) Hit the 'pick-up+delivery' button:

- Notes:
- Use the 'delivery' button if the driver doesn't need the pick-up details
- Use the 'pick-up' button if the driver doesn't need the delivery details
Show assigned job on the mobile device
- Start the browser on your mobile device and go to address:
https://yourcompany.cargooffice.com/mobile/?1234 - Replace
yourcompanyby your company code - Replace
1234by the 'CardID' or 'PIN' you entered for this driver (only the second part, behind the dot)

- The page shows the trips assigned to this driver, in this case only one.
- Rutgers is the name of the driver and 0226 is the start date of the trip (mmdd).
- Click on the trip to show the stops and the details of the trip.

Notes
- You can emulate a mobile phone from the dispatch screen by selecting the driver in the left panel and clicking the 'pda' button.
- If you are unable to enter a signature on your device then you probably need to install the Flash player. Ask your supplier or visit Adobe at http://www.adobe.com/products/flashplayer_pocketpc/downloads/player.html

- All report buttons are editable to suit your application needs.
- If your device has a barcode scanner then you can scan multiple shipments in one go to report pick-ups, deliveries or cross-dock locations in your warehouse.
- The buttons send shortcodes to the server (the so called 'dot-codes'), nothing happens unless you define some actions for these dot-codes, e.g. change the status of a shipment. For detailed information on dot-codes see: DotCodes
Add an icon to your home screen
- Open the web page.
- Press the Menu button (either below the screen on some devices or at the top-right corner of the browser) , then tap on Page.
- Tap Add Page Shortcut.
- Your shortcut should now appear on your home screen
-- RutgerRutgers - 20 Sep 2006
| I | Attachment | History | Action | Size | Date | Who | Comment |
|---|---|---|---|---|---|---|---|
| |
pda00.gif | r1 | manage | 12.0 K | 2008-02-26 - 09:23 | HenkRoelofs | PDA example |
| |
pda01.gif | r3 r2 r1 | manage | 21.5 K | 2008-02-25 - 12:32 | HenkRoelofs | add node button |
| |
pda02.gif | r4 r3 r2 r1 | manage | 28.0 K | 2008-02-25 - 15:04 | HenkRoelofs | Dispatch |
| |
pda03.gif | r4 r3 r2 r1 | manage | 15.2 K | 2008-02-25 - 18:20 | HenkRoelofs | |
| |
pda04.gif | r2 r1 | manage | 33.3 K | 2008-02-25 - 18:19 | HenkRoelofs | delivery details |
This topic: Cargooffice > AboutFreecargo > FreightExchangeHowto > WebHome > TracktraceDocumentation > ElectronicSignature > PdaDescription
Topic revision: r14 - 2018-11-08 - RutgerRutgers
Ideas, requests, problems regarding TWiki? Send feedback

