Dispatch
General description of the Dispatch Screen
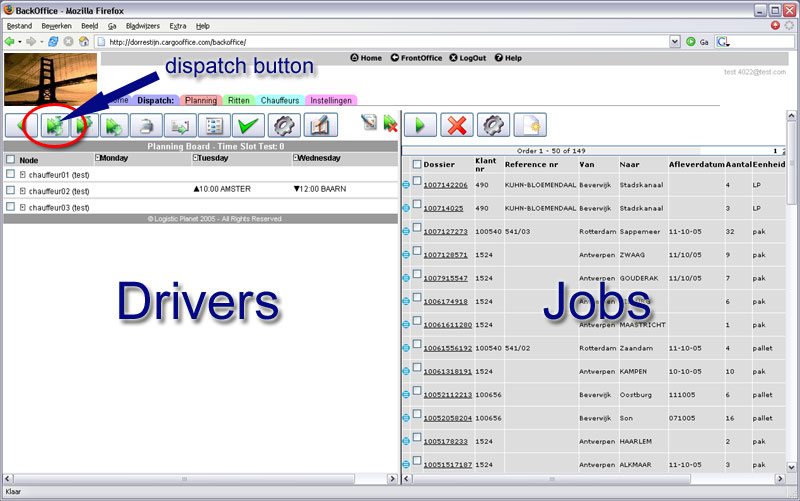
- The Dispatch screen shows a left frame and a right frame.
- The left frame shows the drivers with their assigned jobs and the right frame the jobs to do.
- The aim is to assign jobs to drivers by selecting one or more jobs on the right and a driver on the left and then click the [dispatch] button.
- Both frames can be enlarged to the full width of the screen by dragging the divider-bar or by clicking the [ < ] or [ > ] buttons.
Enlarge
Assigning jobs
- For each assigned job two black triangles show op behind the drivers name, one for the pick-up and one for de delivery.
- A assigned job automatically disappears from the right frame.
- For distribution jobs it is possible to assign just the delivery. This reduces the number of triangles. Use one of the other two [dispatch] buttons for this purpose (it is also possible to assign just the pick-up).
- If the driver uses a pda or onboard computer the colour of the triangles will change depending on the status of the job. Ultimately the colour green tells us that the job was successfully completed. Every other colour tells us that something is wrong.
- Clicking on one of the triangles shows the details of a job including all status changes. (Netscape and Mozilla users: click twice).
- To remove a job from a driver just 'drag' the triangle to the [remove job] button in the right upper corner of the left frame. The removed job shows up in the right frame so that it can be re-assigned to a different driver.
- It is possible to drag a triangle to another day. Just drop it on the small arrow symbol directly in front of the day name. The delivery date (or pick-up date) date will be changed accordingly.
- It is also possible to drag a triangle to another driver. Just drop it on the small arrow symbol directly in front of the driver's name. The delivery (or pick-up) will be assigned to the new driver automatically.
- Please note that the pick-up triangle can be dragged independently from the delivery triangle and inadvertently be assigned to a different driver. However, this might be exactly what the planner wants, for instance in cases where trailers are switched to other drivers.
Driver job list
- When all jobs for a particular driver are assigned, the driver job list can be printed.
- Select the driver(s) and click the [driver job list] button.
Close trip
- As soon as a trip is complete it must be closed to removed from the planning screen.
- Select the driver(s) who's trips can be closed and click the [close trip] button.
Update Job Details
- To edit the job details you can drag a triangle to the [edit] button which is next to the [remove job] button in the upper right corner of the left frame. The job details will appear and can be changed.
- In the right frame there is a small blue edit symbol which can be clicked to change job details from that frame.
Add invoice- and profit-loss data
- Use the 'Update Job Details' procedure described before to call the 'job details' form.
- Click the 'profitloss' tab.
- Fill out the form and add charges and expenses for the job.
- The charges you enter will return on the invoice.
Job splitting
- Use the 'Update Job Details' procedure described before to call the 'job details' form.
- Click the [Split] button.
- The data for the new (split off) job appear, you can change this to whatever the new job has to be.
- After hitting the [Submit] button, the details of the original job reappear so that you can change these too.
- You can always recall and edit the details of both jobs again by using the two grey tabs on top of the Job Details Form.
Examples for splitting jobs
- The shipment is too large for one vehicle:
- Click the [Split] button, change the quantity for the new (split off) shipment and hit the [Submit] button.
- The original shipment reappears where you have to change the quantity too.
- The job is split into two separate trips:
- Click the [Split] button, change the pick-up address for the second trip and hit [Submit].
- The original shipment re-appears where you change the delivery address for the first trip.
- The driver could not pick-up all the goods:
- Click the [Split] button, change the quantity for the new (split off and still to do) job and hit the [Submit] button. If necessary you can directly change the pick-up date here too.
- The original job re-appears where you change the original quantity into the actual picked-up quantity.
- The new (split off and still to do) job appears in the right frame so that it can be assigned to another driver or the same driver for the next day.
Adding new jobs
- By using the [new job] button you can add a new jobs to the right frame.
(Normally new jobs are entered by clients or are received by EDI) .
Select a specific driver group
- By using the [Settings] button in the left frame you can select a specific group of drivers (only possible if you assigned a group name to drivers).
- You can add new drivers or edit existing drivers through the tab 'Drivers' on top of the screen.
- By using the [add driver] button you can add new drivers.
- The details of a driver can be edited by selecting a driver en hitting the edit button.
- Here you can also assign a group name to a driver.
Select specific jobs
- By using the [Settings] button in the right frame you can select jobs with certain characteristics.
Remarks
- The columns in the right frame are selectable, you can choose what data is displayed here:
Backoffice -> Track & Trace Systeem -> Settings -> ttinfolistcolumns.
-- HenkRoelofs - 10 Oct 2005
Topic revision: r2 - 2005-10-10 - HenkRoelofs

|
|
|
|
Ideas, requests, problems regarding TWiki? Send feedback