Add new users
About
There is at least one admin user (userlevel 70) who is able to add new users.For new companies it is always the first user who becomes automatically the admin user.
The user list
- Go to: Backoffice -> Settings -> Users
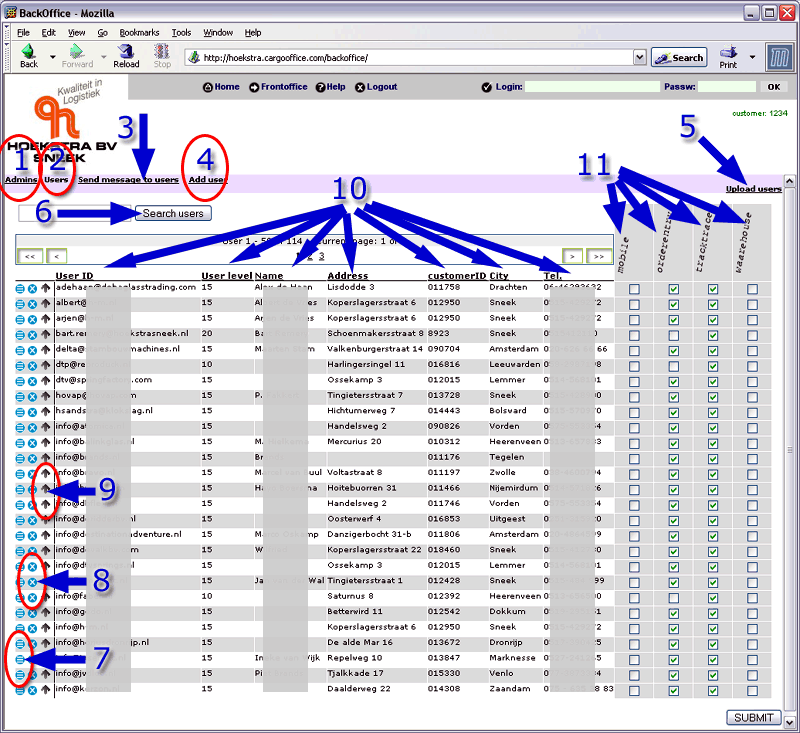
- The image below shows an example user list, a description follows
 |
- Button to show just admin users (userlevel 70 users)
- Button to show all users (the default)
- Button to send a message to all users
- Button to add a new user (see above)
- Upload a userfile
- Search users.
-
 Edit user details
-
 Delete user
-
 = upgrade to admin user ,
  = downgrade to a 'normal' user
- User details (for privacy some details are made unreadable).
- Allowed systems (check the systems the user is allowed to access)
Note: admin users have access to all systems. See admins (1).
Add a new user
- Click Add user link (button (4) in the example above)
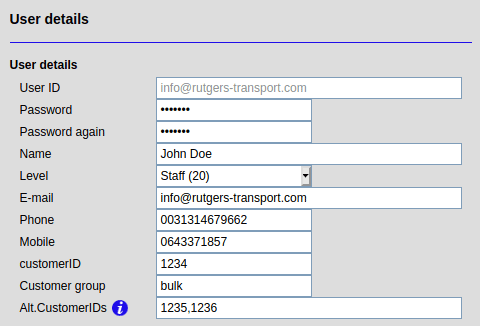
- The following form appears (example):
 |
- User ID: The user must be an email address (has to contain a "@")
 It is possible to use a fake email address and enter the users real email address in item Email.
- Customer ID: Shipments entered by this user are booked under this customer number or customer ID.
max 13 characters. - Alt.CustomerIDs: external users also get to see shipments for these customers
separate customerIDs with a comma, DO NOT use blank space. - Level is the user level:
- 10 = Customer: e.g. customers using order entry and track & trace
- 11 = Customer + update: customers allowed to update already booked shipments
- 15 = Subcontractor: subcontractors are allowed to change statuses of assigned jobs
- 20 = Staff: staff members are allowed to access the backoffice
- 30 = Finance: financial staff can be given access to Billing and invoicing system
- 70 = Admin users admin users are allowed to add new users and do other things, see: AdminFunctions
- More info read User details modification.
| I | Attachment | History | Action | Size | Date | Who | Comment |
|---|---|---|---|---|---|---|---|
| |
addusers01.gif | r1 | manage | 119.3 K | 2006-08-31 - 13:21 | RutgerRutgers | User overview |
| |
addusers02.gif | r2 r1 | manage | 6.1 K | 2008-01-07 - 17:46 | HenkRoelofs | |
| |
addusers02.png | r1 | manage | 26.2 K | 2016-12-27 - 11:39 | RutgerRutgers | Add users |
This topic: Cargooffice > AddUsers
Topic revision: r16 - 2017-03-23 - RutgerRutgers
Ideas, requests, problems regarding TWiki? Send feedback

